

 русский
  Español
 -
The Importance of Modern Brass Bathroom Shower Hardware in Enhancing Plumbing Systems

Feb 18, 2025
In the modern plumbing and bathroom hardware industry, the demand for quality materials and reliable components has never been higher. Modern Brass Bathroom Shower Hardware stands at the forefront of this trend, offering a wide array of products designed to enhance the efficiency, durability, and aesthetics of bathroom systems. Key components such as building pipe clamps, radiator brackets, floor drains, stainless steel manifolds, manifold brackets, couplers, valves, bathtubs, and water meter brackets are critical to creating robust and long-lasting plumbing systems. This article will explore how these modern brass components contribute to the overall success of plumbing installations and their growing importance in both residential and commercial applications.
Building Pipe Clamps: The Backbone of Plumbing Systems
One of the foundational elements in any plumbing installation is the building pipe clamp. These clamps are designed to secure pipes in place, preventing unwanted movement that could result in leaks or system failures. Modern Brass Bathroom Shower Hardware often incorporates these clamps due to brass’s corrosion resistance and long-lasting durability, making it an ideal material for securing pipes in high-moisture areas such as bathrooms.Building pipe clamps are essential for ensuring that pipes remain securely mounted to walls or ceilings. By stabilizing the pipes, they prevent issues such as water pressure loss, wear from vibration, and the risk of leaks. Their ability to withstand conditions, including high humidity and fluctuating temperatures, makes them indispensable in modern plumbing systems.
Radiator Brackets: Reliable Support for Efficient Heating
Another key component in bathroom installations is the radiator bracket. These brackets support radiators, ensuring they are securely mounted to the wall. Brass radiator brackets not only offer strength and reliability but also enhance the aesthetic appeal of the radiator installation. Modern Brass Bathroom Shower Hardware offers radiator brackets that are designed to distribute the weight of the radiator evenly, ensuring that the unit remains stable and efficient over time.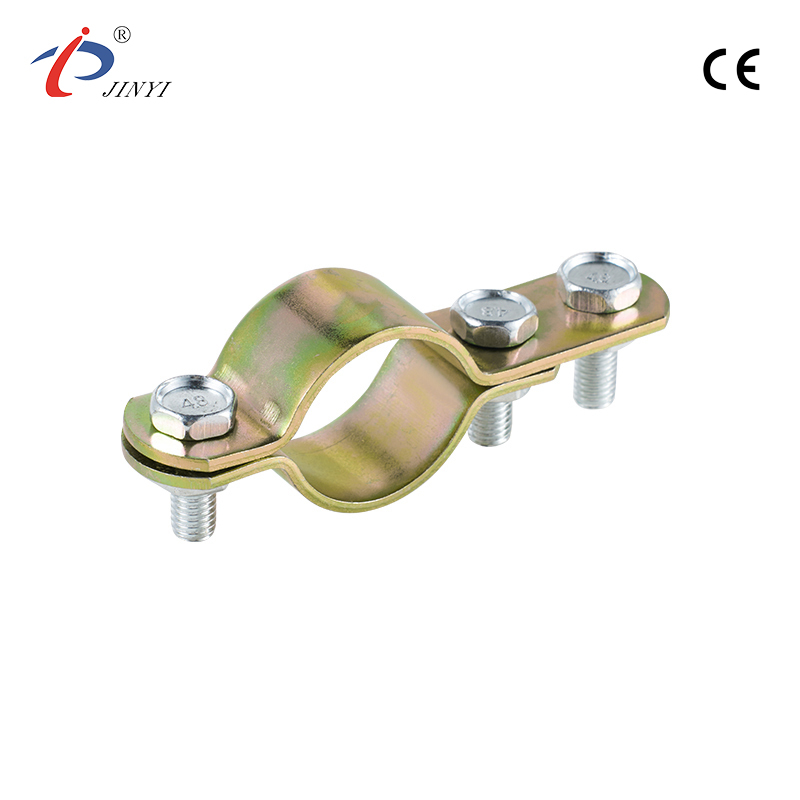
Radiator brackets made from brass are especially popular in bathrooms, where high moisture levels could lead to corrosion in traditional metal brackets. The natural corrosion resistance of brass ensures that the radiator remains securely in place, even in humid environments.
Floor Drains: Preventing Water Accumulation and Ensuring Safety
In any bathroom, managing water flow is crucial to maintaining a clean and safe environment. Floor drains are essential for preventing water accumulation, and Modern Brass Bathroom Shower Hardware provides high-quality, durable options to ensure effective drainage. Brass floor drains are designed to handle the demands of daily use while maintaining functionality and appearance.Floor drains made from brass are highly effective at preventing water pooling on the bathroom floor, which could lead to mold growth or slip hazards. Their design allows for efficient water drainage, reducing the chances of water damage and ensuring that the bathroom remains safe and hygienic. With their corrosion-resistant properties, brass floor drains are particularly well-suited to environments where moisture is a constant concern.
Stainless Steel Manifolds and Manifold Brackets: Centralizing Water Distribution
In plumbing systems, particularly in larger installations, stainless steel manifolds and manifold brackets play a crucial role in centralizing water distribution. Manifolds distribute water evenly to various parts of the system, while manifold brackets secure them in place to maintain stability and prevent any shifts or damage. Modern Brass Bathroom Shower Hardware integrates these components with high-quality materials to ensure efficient operation and longevity.Brass manifolds and manifold brackets offer strength and resistance to corrosion, making them ideal for use in bathrooms where moisture exposure is common. These components are designed to work together to ensure that water flows evenly throughout the system, preventing any issues with uneven water pressure.
Couplers and Valves: Ensuring Proper Flow Control
Couplers and valves are vital for regulating the flow of water within plumbing systems. Brass couplers are used to connect two pipes, ensuring a leak-proof seal and efficient water flow. Similarly, valves are essential for controlling the pressure and flow of water within the system. -
The Essential Role of Bathroom Square Brass Floor Drains in Modern Bathrooms
Feb 18, 2025
In the ever-evolving world of home improvement, functionality and safety are at the forefront of consumers’ minds when selecting products for their homes. Among the essential components that contribute to a safe, clean, and functional bathroom, the Bathroom Square Brass Floor Drain stands out as a crucial fixture. These floor drains not only help prevent water damage and mold growth but also enhance the overall bathroom design. Let’s explore the critical advantages and increasing popularity of bathroom floor drains, particularly the Bathroom Square Brass Floor Drain, and how they contribute to the long-term integrity and aesthetic appeal of modern bathrooms.
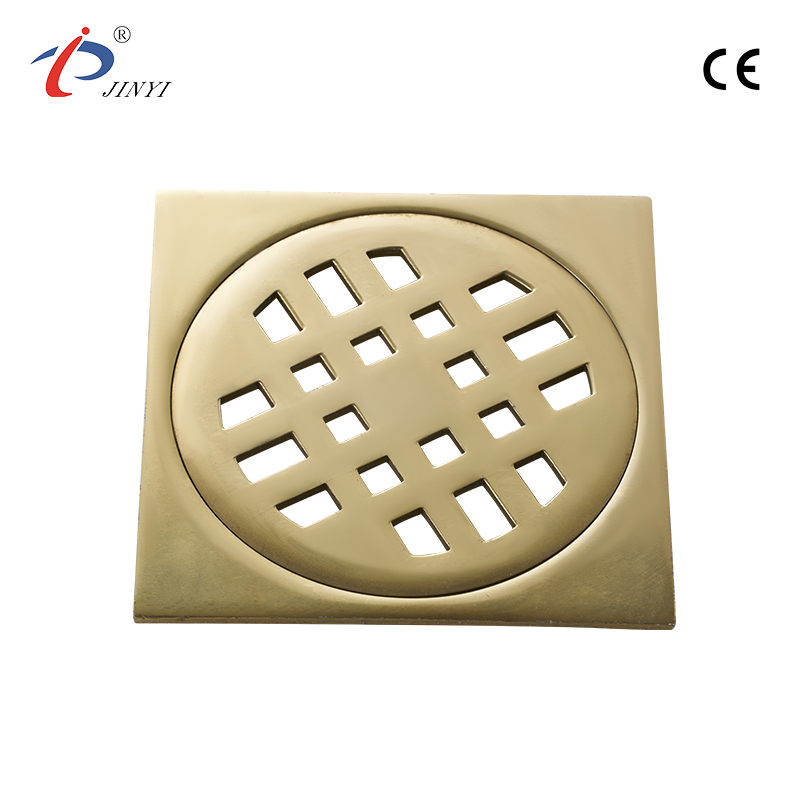
Understanding the Functionality of Bathroom Square Brass Floor Drains
A Bathroom Square Brass Floor Drain is a specially designed plumbing fixture that facilitates the efficient removal of water from bathroom floors. When properly installed, these drains prevent water accumulation, which could otherwise lead to unsightly puddles, water damage, or safety hazards. The drain works by collecting water that accumulates on the floor—typically from showers, bathtubs, sinks, or spills—and channeling it through the drain pipe to the home’s wastewater system.The drain’s structure is engineered to ensure that water flows seamlessly into the drainage system without obstruction, thus preventing water from pooling in the bathroom. This functionality is particularly crucial in high-moisture environments such as bathrooms, where water splashes from showers or bathtubs can create slippery conditions on the floor.
Key Advantages of Bathroom Square Brass Floor Drains
1. Prevention of Water Accumulation
One of the primary benefits of the Bathroom Square Brass Floor Drain is its ability to effectively manage water flow, preventing accumulation on the floor. Water pooling on the floor in bathrooms can lead to numerous problems, including mold growth, water damage, and unsafe walking conditions.The Bathroom Square Brass Floor Drain ensures that water is efficiently removed from the surface, keeping the bathroom floor dry and safe. This is especially important in shower areas, where water is often splashed onto the floor, creating potential hazards. A properly functioning floor drain reduces the likelihood of water standing in areas where it’s dangerous, thus enhancing safety.
Additionally, preventing water from accumulating in bathroom spaces helps reduce the risk of costly water damage to the flooring and surrounding areas. This is particularly critical in modern bathrooms where expensive tile or hardwood floors are often installed. By removing water promptly, the Bathroom Square Brass Floor Drain ensures that floors remain in pristine condition for years to come.
2. Durability and Longevity
Constructed from high-quality materials such as brass, the Bathroom Square Brass Floor Drain is built to withstand the test of time. Brass is a durable, corrosion-resistant material that ensures the floor drain remains functional and attractive for many years. Brass resists rust and wear from the moisture-rich environment typical in bathrooms, providing long-lasting reliability and performance.The durability of brass also means that the Bathroom Square Brass Floor Drain won’t degrade or lose its effectiveness over time, unlike other materials that may corrode and need frequent replacement. With proper maintenance, a brass floor drain can easily last the lifetime of the bathroom, making it a sound investment in the long term.
3. Easy Maintenance and Cleaning
Another significant advantage of the Bathroom Square Brass Floor Drain is its ease of maintenance. The square design of the drain makes it easy to remove the grate for periodic cleaning. This design helps to keep the drain free from debris such as hair, soap scum, and other buildup that may obstruct water flow.Cleaning and maintaining a Bathroom Square Brass Floor Drain is straightforward, with homeowners able to perform the task without the need for professional help. By regularly cleaning the drain, homeowners can prevent blockages and maintain efficient water flow, extending the lifespan of the plumbing system as a whole.
4. Aesthetic Appeal and Customization
In addition to its functionality, the Bathroom Square Brass Floor Drain enhances the overall aesthetic of a bathroom. Brass’s sleek and modern finish adds a touch of luxury to bathroom spaces, complementing a variety of bathroom styles—from contemporary and minimalistic to more traditional designs.The square shape of the drain also allows for a more streamlined and aesthetically pleasing design compared to the more common round drains. With a variety of finishes available, including polished, brushed, or antique brass, homeowners can choose the style that matches their bathroom decor, adding an extra layer of sophistication and visual appeal to the space.
-
The Critical Role of Outdoor Single Water Tap Faucet Valves in Modern Plumbing Systems
Feb 18, 2025
In both residential and industrial plumbing systems, valves are integral components that ensure the efficient regulation of water, steam, air, or other gases and fluids. Among the many types of valves available, Outdoor Single Water Tap Faucet Valves stand out for their functionality, adaptability, and energy efficiency. These valves play a vital role in ensuring that water flows smoothly and is properly managed in outdoor and plumbing applications, particularly in home construction and bathroom installations.
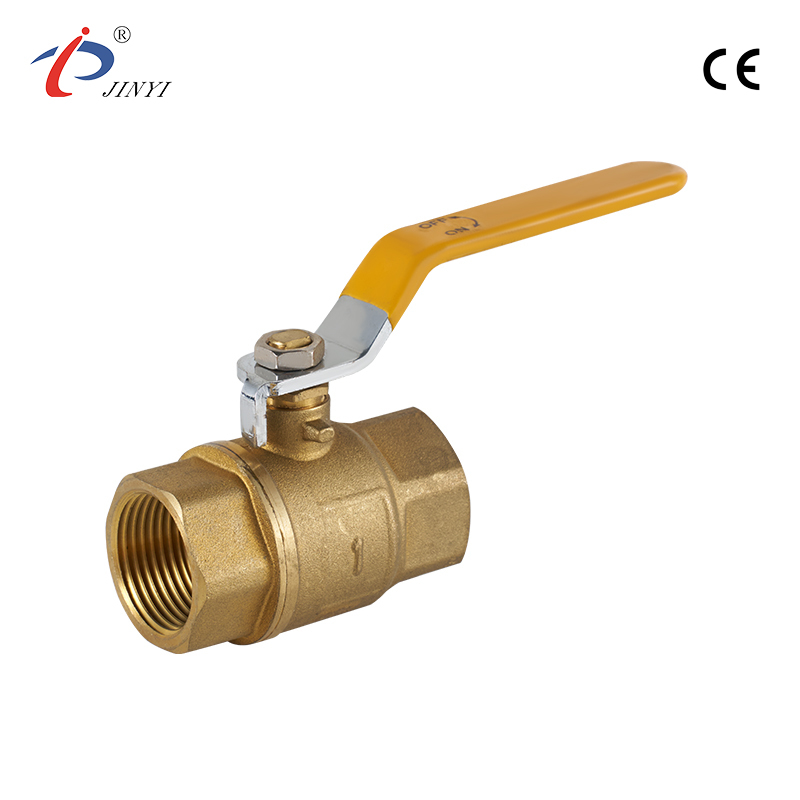
Understanding the Functionality of Outdoor Single Water Tap Faucet Valves
An Outdoor Single Water Tap Faucet Valve is a mechanical device designed to control the flow of water or other fluids within a pipeline system. These valves are typically installed in plumbing systems where water needs to be regulated at various points, such as in garden hoses, irrigation systems, or outdoor faucets. The primary function of these valves is to allow users to open, close, or adjust the water flow, ensuring pressure and preventing wastage.These valves operate by adjusting the size of the passageway through which water flows. When the valve is open, water can flow freely; when the valve is closed, the flow is blocked, preventing water from continuing through the pipeline. This simple yet essential mechanism helps ensure efficient water usage and helps manage water flow in various plumbing scenarios, from domestic bathrooms to outdoor irrigation systems.
Key Advantages of Using an Outdoor Single Water Tap Faucet Valve
1. Precise Flow Control
The Outdoor Single Water Tap Faucet Valve provides exceptional control over the flow of water, ensuring that water is directed where it is needed with the right amount of pressure. Whether you are watering plants, filling up a pool, or using outdoor cleaning equipment, these valves allow users to adjust the water flow according to their specific needs. This level of control helps conserve water, prevents excessive wastage, and ensures that the right amount of pressure is maintained for efficient operation.In plumbing systems, accurate flow control is crucial to prevent leaks, disruptions, or sudden bursts of water pressure that can damage pipes and other system components. The Outdoor Single Water Tap Faucet Valve ensures that water flows at a regulated rate, maintaining stability and efficiency across various water systems.
2. Prevention of Leaks and Damage
One of the essential functions of any valve, including the Outdoor Single Water Tap Faucet Valve, is to prevent leakage. These valves are designed to effectively seal off the passage of water when necessary, stopping the flow completely and reducing the likelihood of accidental leakage. This is particularly important in outdoor plumbing systems, where exposure to the elements can cause wear and tear on pipes, faucets, and valves.By maintaining a reliable seal when the valve is closed, these valves also help prevent damage to the plumbing infrastructure. Without valves, water flow can become uncontrollable, to excessive pressure and potential damage to pipes or fixtures. The Outdoor Single Water Tap Faucet Valve ensures that the water pressure remains stable and controlled, preventing wear and tear that could lead to costly repairs.
3. Energy Efficiency and Sustainability
Valves are also crucial in promoting energy efficiency, particularly in household applications such as bathrooms and garden irrigation systems. By regulating the flow of water, Outdoor Single Water Tap Faucet Valves help maintain pressure levels, ensuring that water is used efficiently without unnecessary consumption. This can be particularly beneficial in maintaining heating and cooling systems in homes, where excessive water usage can lead to increased energy costs.In outdoor settings, such as garden irrigation, the valve allows homeowners to control water usage, ensuring that plants are watered efficiently without wasting water. By preventing overwatering and regulating the flow to match the needs of the garden, these valves help reduce water consumption and support sustainable practices. This contributes to overall energy savings, as less energy is required to pump and heat excess water.
4. Versatility and Durability
Outdoor faucets and valves are often exposed to harsh weather conditions, including rain, snow, and temperatures. As a result, the materials used to construct Outdoor Single Water Tap Faucet Valves must be durable and resistant to corrosion, rust, and UV damage. These valves are typically made from high-quality materials such as brass, stainless steel, or weather-resistant plastics, ensuring longevity and reliable performance even in outdoor environments. -
The Rise of the Large Square Power Shower Head: Revolutionizing Bathroom Experiences
Feb 18, 2025
In recent years, the bathroom has changed. It was once a simple utility space. Now it is a place for relaxation and comfort. A key part of this change is the shower. The shower is now a main feature for both function and luxury. One of the new designs in modern shower systems is the large square power shower head. It has become a favorite for many people. People want both performance and style in their daily routine. These shower heads offer good drainage, long life, and user-friendly features. They are changing the shower experience.
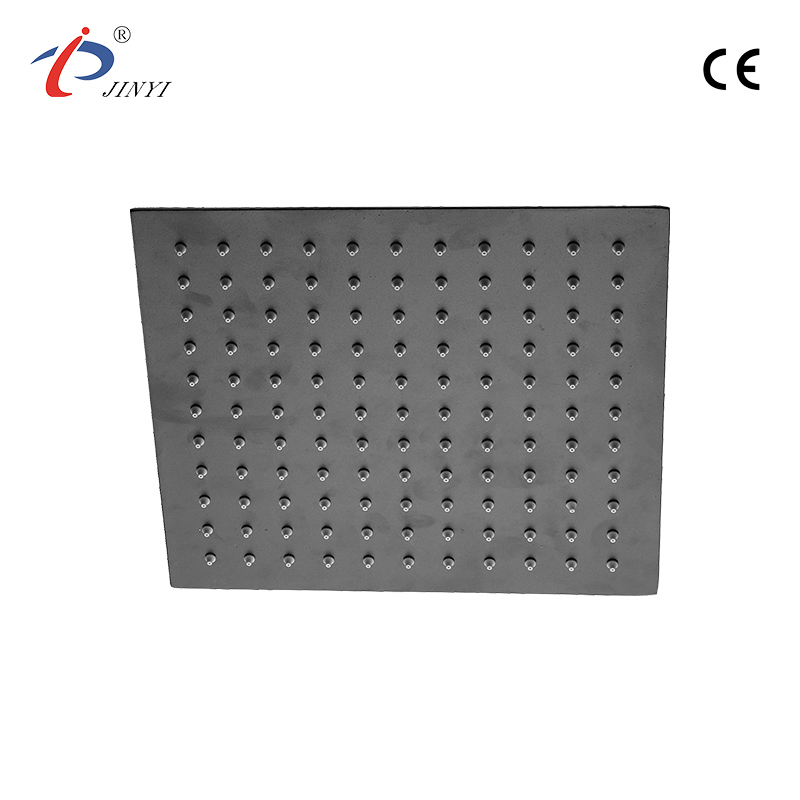
What Is a Large Square Power Shower Head?
A large square power shower head is a modern shower fixture. It has a wide, square-shaped head. It gives a powerful and steady water flow. It is different from traditional round shower heads. The square design gives a larger surface area. This spreads water more evenly across the body. It gives a refreshing and full shower experience. The large square shape feels luxurious. It creates a more spacious flow of water. Many users find this relaxing and satisfying.
The square power shower head is also made for performance. It uses advanced technology to make water pressure better. This improves the overall showering experience. It has multiple adjustable settings and an ergonomic design. It promises to be a valuable addition to any bathroom.
Advantages of Large Square Power Shower Heads
- Good Drainage and Water Management
One key benefit is their ability to manage water drainage well. A common problem in many bathrooms is water pooling on the floor. This can cause slipping hazards and discomfort. But, these shower heads are usually used with high-quality shower channel drains. These drains work well to stop water buildup.
They help move water away quickly and well. This keeps the bathroom floor dry. It lowers the risk of accidents and improves safety. These drains are made to handle constant water flow. They are built from strong materials. These materials can take constant exposure to water. This makes them reliable and low-maintenance over time. Users can feel at ease. They know the bathroom will stay safe and dry during and after the shower.
- Long-Lasting Durability
Durability is another big advantage. These fixtures are built with high-quality materials. Examples are stainless steel and chrome finishes. These materials fight corrosion, rust, and general wear and tear. Showers are always exposed to moisture. So, durability is very important when choosing a shower head. The large square power shower head does very well in this area.
The strong build means these shower heads will last for years. They will not break down easily. They offer long-lasting performance. Many traditional shower heads wear out fast. This can be from mineral buildup or corrosion. The advanced materials in these shower heads are different. They keep their look and function for a long time. This durability makes them a great investment. Homeowners can upgrade their bathrooms without needing much maintenance.
- Water Control and Pressure Balance
A standout feature is excellent water control and pressure balance. Many models have adjustable settings. Users can change the water flow and pressure to their liking. You might want a gentle mist for relaxation. Or you might want a high-pressure stream to wake you up. The flexibility of these shower heads allows for a custom shower every time.
Also, the design often includes multiple spray settings. Users can switch between different patterns. Patterns include rain, mist, or massage. These settings let you adjust the shower for different moods and needs. For example, a soothing rain setting is good after a long work day. A more invigorating massage setting can help relieve tension and improve blood flow.
Users can control the pressure and flow of water. This improves the overall shower experience. It creates a more enjoyable environment. This level of customization is especially good for families. Family members often have different preferences. It makes sure everyone can have their ideal shower.
-
The Role of Metal Decoupling Tanks in Optimizing Fluid and Gas Flow Systems
Feb 18, 2025
In industrial settings, the need for efficiency and flexibility is paramount. Whether dealing with complex fluid processing, high-pressure systems, or multi-stream gas handling, the integration of a metal decoupling tank has proven to be a game changer. By enhancing system efficiency and providing adaptability across various applications, metal decoupling tanks for liquids offer an innovative solution to improve the performance and sustainability of fluid and gas flow systems.
This article delves into the significant benefits of metal decoupling tanks for liquids, focusing on how they optimize operations, reduce energy waste, and increase flexibility across industries that rely on fluid processing.
What is a Metal Decoupling Tank for Liquids?
A metal decoupling tank for liquids is an industrial-grade component used to separate different streams of liquids or gases in a system, preventing cross-contamination. The tank allows for better control over the flow dynamics within a pipeline or processing system by decoupling the various fluids, ensuring that each one flows without interference from the others. This separation leads to greater efficiency, reduced risk of contamination, and the ability to maintain specific conditions for each fluid stream.Crafted from high-quality metals, metal decoupling tanks are designed to withstand harsh conditions, including temperatures, pressures, and corrosive environments. The durability of the metal ensures that the tanks remain reliable and effective for long-term use across various industries, from chemical processing to energy production.
Advantages of Metal Decoupling Tanks for Liquids
1. Enhanced Efficiency
One of the primary benefits of a metal decoupling tank is its ability to significantly enhance the overall efficiency of fluid and gas flow systems. In many industrial processes, different fluids or gases are transported through a shared network of pipes. Without proper separation, these streams can interfere with each other, to energy waste, reduced throughput, and even system malfunctions.
A metal decoupling tank works by isolating each stream, preventing cross-contamination and maintaining flow conditions for each. This means that each fluid can be processed, treated, or transported under the favorable conditions without the risk of contamination from other substances. As a result, systems operate at peak efficiency, and energy consumption is reduced, lowering overall operational costs.
By improving the flow dynamics and preventing interference, the metal decoupling tank not only ensures smoother operations but also minimizes the risk of costly downtime or system failures. This enhancement of operational efficiency is crucial for industries where uptime and reliability are key to profitability.
2. Flexibility in Application
Another standout feature of metal decoupling tanks for liquids is their adaptability to a wide range of industrial applications. These tanks are designed to be flexible and customizable, allowing them to integrate seamlessly into existing systems. Whether used in high-pressure or low-pressure systems, in environments with fluctuating temperatures, or where harsh chemicals are involved, the metal decoupling tank can be tailored to meet specific requirements.This versatility ensures that the decoupling tank can be used across various industries, from chemical and pharmaceutical manufacturing to oil and gas production. The tank’s ability to handle conditions, such as high-temperature processing or the transportation of volatile liquids, makes it a crucial component in systems that require precise control over the flow and separation of liquids and gases.
3. Prevention of Cross-Contamination
One of the critical functions of a metal decoupling tank for liquids is its role in preventing cross-contamination between different fluid streams. In many industries, it is essential that different chemicals, liquids, or gases do not mix, as even the slightest contamination can lead to product degradation, safety hazards, or system inefficiencies. The decoupling tank’s design ensures that each fluid stream is kept separate, reducing the risk of mixing or contamination.For example, in the chemical processing industry, where precise formulations and processes are essential, maintaining the purity of individual fluid streams is critical. A metal decoupling tank ensures that each stream is handled independently, safeguarding product quality and system performance. Similarly, in the oil and gas sector, separating different fluid streams during transportation or processing prevents the contamination of valuable resources, ensuring the integrity of the final product.
-
The Importance of Shower Bases Tray Leg Support Frames in Modern Bathroom Installations
Feb 18, 2025
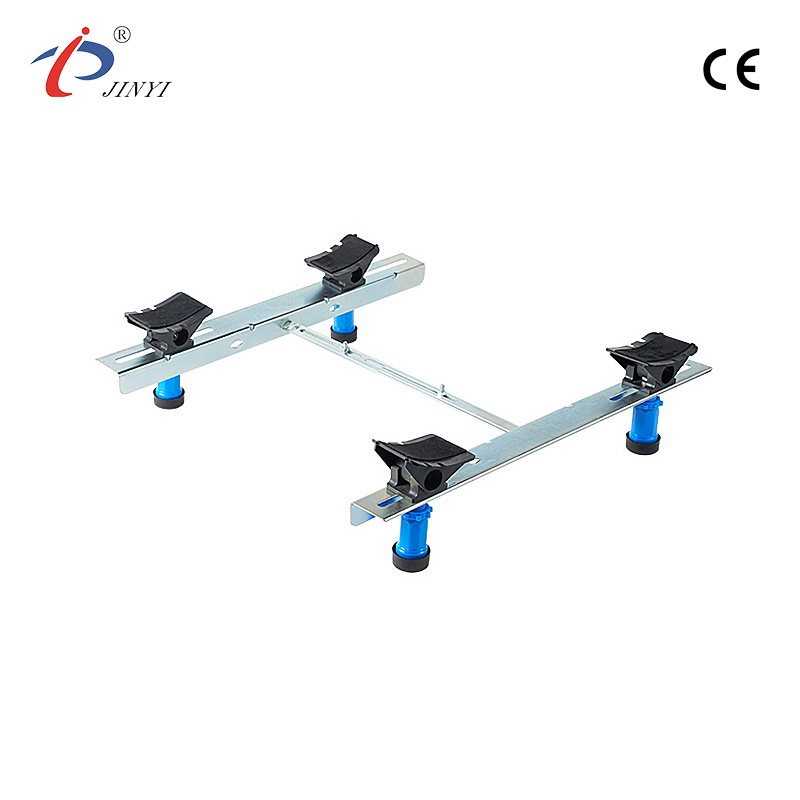
A good shower feels strong and secure under your feet. You never think it might bend or crack. Much of this feeling comes from a part you never see: the shower bases tray leg support frame. This metal structure is hidden below the shower tray. It is very important. It holds everything up. Whether you are building a new bathroom or fixing an old one, knowing about this frame helps you make a better, longer-lasting shower.
What Does This Frame Do?
Think about a table. The tabletop is like your shower tray. The legs are like the support frame. Without strong legs, the table wobbles and breaks. The shower bases tray leg support frame does the same job for your shower. It is a custom-made skeleton. Its job is to hold the shower tray perfectly level and perfectly still. It spreads your weight and the water's weight evenly to the floor below. This stops the tray from sagging in the middle. It also stops the seals around the edges from breaking. A broken seal causes leaks. Leaks cause rot and mold in your floor. So, a good frame protects your whole bathroom.
Why You Really Need One
You might ask, "Can't I just put the shower tray on the floor?" Sometimes you can, but it is risky. Many floors are not perfectly flat. A tray sitting on an uneven floor will have stress points. Over time, this stress can cause cracks. Also, there is often a gap under the tray for the drain pipe. The frame bridges this gap safely. It provides full support. Using a frame is the professional way. It makes your shower safe and durable.
Choosing the Right Material
Frames come in different materials. The choice affects strength, price, and how long it lasts.
- Galvanized Steel: This is a common and good choice. The steel is coated with zinc to fight rust. It is strong and costs less than stainless steel. It is perfect for many home bathrooms.
- Stainless Steel: This is the choice for fighting rust. It is ideal for very wet areas or places with salty air. It is stronger and lasts longer than galvanized steel. It costs more, but it is a top-quality option.
- Aluminum: Aluminum frames are light and do not rust. They are not as strong as steel. They are good for lighter shower trays or where weight is a big concern.
Key Features to Look For
When you buy a shower bases tray leg support frame, check for these things:
- Adjustable Legs: This is the important feature. Each leg should screw up and down. This lets you make the frame perfectly level on any floor. It also lets you set the exact height for your tray.
- Strong Braces: Look for cross-braces between the legs. These are extra bars that stop the frame from twisting side to side. More braces usually mean a more rigid frame.
- The Right Size: Frames are made for specific tray sizes (like 1200x800mm). You must match the frame size to your tray size. Some frames are adjustable in width and length to fit a range of sizes.
- Non-Slip Pads: The top of the frame should have pads or lips. These stop the shower tray from sliding around once it is placed on the frame.
How to Install It
Installing the frame is a straightforward job. Here are the basic steps:
- Prepare the Floor: The floor must be clean and solid. Make sure the area is clear of old debris.
- Assemble the Frame: Follow the instructions. Put the frame pieces together. Usually, you just need a screwdriver. Do not fully tighten all screws yet.
- Position and Level: Place the frame where the shower will go. Use a long spirit level. Adjust each leg until the frame is perfectly level from front to back and side to side. Then tighten all the screws firmly.
- Place the Tray: Carefully lower the shower tray onto the frame. It should sit evenly with no rocking. You should not stand in the tray yet.
- Connect the Drain: Finally, connect the tray's drain to the waste pipe under the frame. Now the shower is ready for the next steps, like tiling the walls.
-
The Importance of Water Meter Support Fixing Brackets in Modern Water Systems
Feb 18, 2025
In the evolving world of water distribution systems, ensuring that water meters remain securely in place is critical to maintaining accurate readings, preventing damage, and minimizing system malfunctions. This is where water meter support fixing brackets play an essential role. These specialized brackets provide the stability and support required to ensure that water meters, which measure the flow of water in both residential and industrial settings, are properly secured, aligned, and maintained. In this article, we will explore the significance of water meter support fixing brackets, highlighting their advantages in enhancing system performance and reducing maintenance costs.
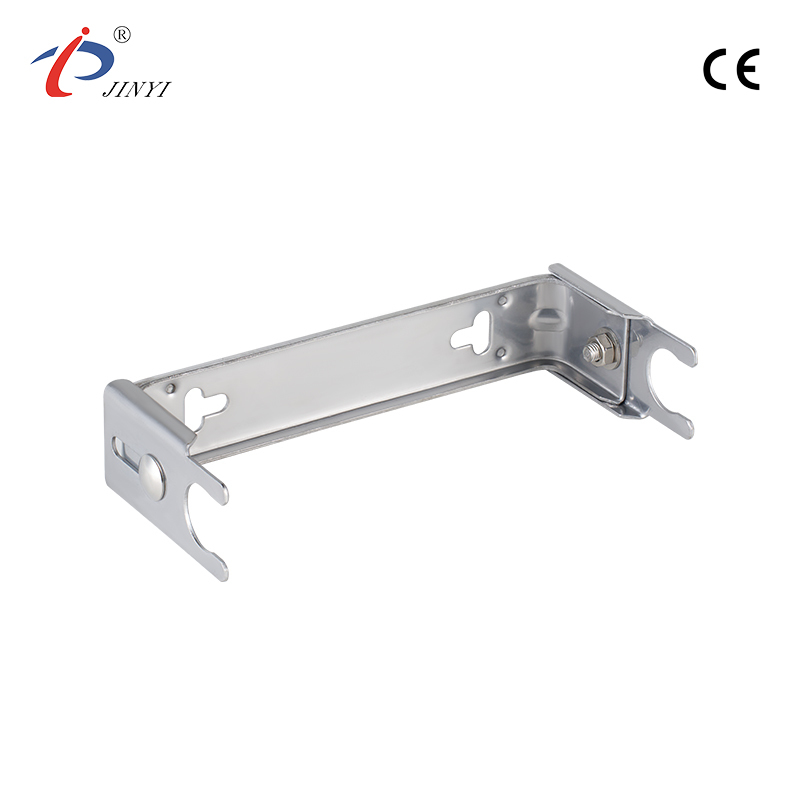
What Are Water Meter Support Fixing Brackets?
A water meter support fixing bracket is a mounting tool designed to securely hold and stabilize water meters in place within plumbing systems. Water meters are essential for measuring water consumption and ensuring accurate billing for water services. The bracket helps maintain proper alignment and prevents shifting or misalignment of the meter during its operation. These brackets are compatible with various water meter models, offering versatile support for both household and industrial applications.Key Advantages of Water Meter Support Fixing Brackets
1. Enhanced Stability and Support
The primary advantage of using water meter support fixing brackets is the enhanced stability they provide. These brackets are designed to securely hold different water meter sizes and types, ensuring that the meter is mounted firmly in place. In both residential and industrial settings, water meters are subjected to varying pressure levels and vibrations. Without proper support, the water meter can shift or become misaligned, resulting in inaccurate readings, damage to the meter, or disruption in the water flow.With the water meter support fixing bracket, the meter remains stable and aligned, even under challenging conditions. This stability reduces the likelihood of shifting during normal operation, thus preventing wear and tear. A securely mounted water meter is less likely to experience malfunctions caused by misalignment, ensuring that it provides accurate readings throughout its lifespan. This is particularly important in industrial applications where large volumes of water are measured and accurate readings are essential for maintaining system integrity.
2. Reduces Wear and Tear
Another key benefit of water meter support fixing brackets is their ability to reduce wear and tear on the water meter itself. Over time, without proper support, the water meter may experience stress from environmental factors, including vibrations from nearby machinery, temperature fluctuations, or water flow changes. These factors can cause components within the water meter to wear out prematurely, to costly repairs or replacements.By securely holding the water meter in place, the water meter support fixing bracket minimizes the impact of external forces, helping to preserve the integrity of the meter. The bracket ensures that the meter remains aligned and stable, preventing unnecessary strain on the meter’s components. This stability ultimately extends the life of the water meter, reducing the need for frequent servicing or replacements and providing long-term cost savings.
3. Ease of Installation
Water meter support fixing brackets are designed with ease of installation in mind. Equipped with intuitive mounting systems, these brackets can be installed in a matter of minutes, reducing both time and labor costs. The user-friendly design eliminates the need for complex tools or professional expertise, allowing both contractors and DIYers to install the bracket efficiently.water meter support fixing brackets come with pre-drilled holes and standardized mounting patterns, making them compatible with a wide range of water meter models. Whether you're installing a new water meter or upgrading an existing one, the ease of installation ensures that the process is quick and hassle-free. This is especially beneficial in commercial or industrial settings, where minimizing downtime is crucial to maintaining uninterrupted water supply and system performance.
4. Quick and Easy Replacement
In scenarios where the water meter needs to be replaced or serviced, the water meter support fixing bracket allows for quick detachment, making the replacement process easier and faster. Instead of requiring significant time and effort to remove a securely mounted meter, the bracket ensures that the water meter can be detached with minimal disruption to the system. -
The Importance of Metal Manifold Fixing Brackets in Modern Plumbing Systems
Feb 18, 2025
In the evolving landscape of plumbing and HVAC systems, metal manifold fixing brackets have emerged as essential components in ensuring the efficiency and reliability of installations. These brackets, typically crafted from high-quality stainless steel, offer a robust and corrosion-resistant solution for securely mounting manifolds that control the flow of water or other fluids. The versatility, durability, and ease of installation offered by metal manifold fixing brackets make them a critical element in both residential and commercial plumbing systems.
What Are Metal Manifold Fixing Brackets?
A metal manifold fixing bracket is a device used to securely mount a manifold to walls or other structural surfaces. Manifolds are integral to modern plumbing systems, as they distribute water evenly to multiple outlets in a home or commercial building. Whether for heating, cooling, or water distribution, manifolds are critical for ensuring consistent and controlled fluid flow throughout the system. A metal manifold fixing bracket ensures that these manifolds are firmly attached and remain stable over time.Advantages of Metal Manifold Fixing Brackets
1. Durability and Corrosion Resistance
One of the significant advantages of metal manifold fixing brackets is their durability and resistance to corrosion. Crafted primarily from stainless steel, these brackets are designed to withstand harsh environments. Bathrooms and kitchens, where humidity levels are often high, can cause wear and rust on standard brackets. However, metal manifold fixing brackets are corrosion-resistant, ensuring that they maintain their strength and appearance for many years, even under damp conditions.The stainless steel material also allows the metal manifold fixing bracket to endure high temperatures, making it suitable for both cold and hot water systems. Whether the system is distributing hot water for a radiant floor heating system or supplying cold water to faucets, the metal manifold fixing bracket ensures that the manifold stays securely mounted, regardless of temperature fluctuations. This durability is particularly essential for maintaining the long-term reliability of plumbing and heating systems in residential or commercial spaces.
2. Easy Installation
Another benefit of metal manifold fixing brackets is their user-friendly design, which makes them easy to install. These brackets are specifically designed to simplify the setup process, reducing the time and effort required to secure manifolds. metal manifold fixing brackets come with pre-drilled holes and are compatible with standard sizes, making installation straightforward. Whether you're installing a new plumbing system or replacing an old manifold, the simplicity of the metal manifold fixing bracket reduces the need for complex tools or specialized knowledge.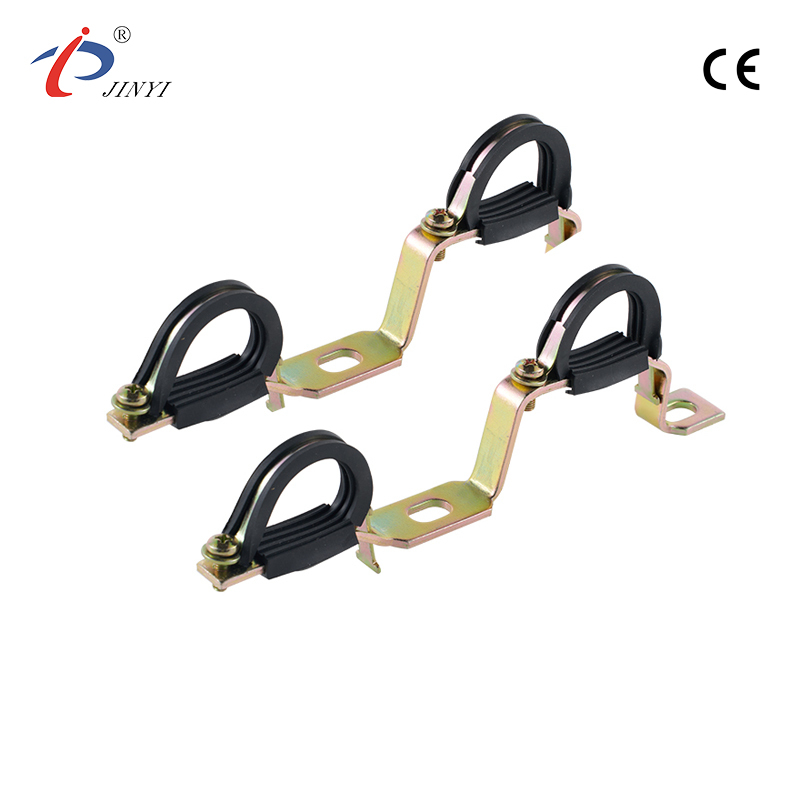
Additionally, the metal manifold fixing bracket can be easily adjusted or repositioned during installation, offering flexibility in positioning the manifold precisely where it is needed. The user-friendly installation process ensures that professionals and DIYers alike can easily integrate these brackets into their plumbing systems without unnecessary delays.
3. Versatile Design
Metal manifold fixing brackets are designed to be compatible with a wide range of manifold sizes. Whether you're working with a small residential manifold or a larger industrial manifold, these brackets offer the versatility needed to accommodate different systems. The ability to use the same metal manifold fixing bracket for various manifold types means that installers don’t need to worry about having multiple types of brackets on hand, streamlining the installation process.The versatility of metal manifold fixing brackets also extends to their adaptability in various settings. These brackets can be used in a wide range of plumbing systems, from traditional water distribution systems to more complex heating systems like underfloor heating. Their ability to fit into diverse system configurations makes them a popular choice for both new installations and retrofit projects.
4. Long-Term Reliability
The long service life of metal manifold fixing brackets is a key selling point for professionals and homeowners alike. These brackets are designed to last, providing long-term reliability in both residential and commercial plumbing systems. Their corrosion-resistant properties ensure that they maintain their structural integrity even in high-humidity environments or areas prone to temperature fluctuations. With their resistance to rust and deterioration, metal manifold fixing brackets help reduce maintenance costs and extend the lifespan of plumbing systems. -
Adjustable Radiator Hold Down Brackets: The Key to Secure and Stylish Bathroom Installations
Feb 18, 2025
In modern bathroom design, radiators are not only functional but also serve as a key element of style and comfort. Ensuring that these radiators are securely mounted is essential for both safety and performance. This is where adjustable radiator hold down brackets come in, offering an ideal solution for securing radiators in place while maintaining the overall aesthetic of the bathroom. In this article, we’ll explore the importance of adjustable radiator hold down brackets, their advantages, and why they’re becoming a staple in both residential and commercial bathroom renovations.
What Are Adjustable Radiator Hold Down Brackets?
Adjustable radiator hold down brackets are specialized mounting hardware designed to securely fasten radiators to walls or other supporting structures. These brackets are engineered to provide a stable, durable solution that can accommodate various radiator types and sizes. The adjustable radiator hold down brackets come with customizable features, ensuring that radiators are properly positioned and aligned according to the needs of the space. They are commonly used in bathrooms and other areas where maintaining secure and reliable installations is crucial.The Advantages of Adjustable Radiator Hold Down Brackets
1. Durability and Strength
One of the key benefits of using adjustable radiator hold down brackets is their exceptional durability and strength. These brackets are crafted from high-quality, corrosion-resistant metals such as stainless steel, ensuring a long-lasting solution in environments where moisture and humidity are common, such as bathrooms. The corrosion-resistant properties of adjustable radiator hold down brackets make them for withstanding the high moisture levels typically found in bathroom spaces. This guarantees that the bracket remains in excellent condition for years, even with constant exposure to steam and water.Furthermore, adjustable radiator hold down brackets are engineered to support various radiator weights, from lightweight models to larger, heavier units. With their enhanced load-bearing capacity, these brackets provide the strength necessary to secure radiators without risk of shifting or detaching. This reliability ensures that your radiator stays firmly in place, contributing to both the safety and efficiency of your heating system.
2. Stable Structure
The structure of adjustable radiator hold down brackets is designed to offer stability. These brackets feature reinforced joints and a robust framework that reduces movement, preventing wear and tear on both the radiator and the wall mounts. When radiators are not securely fastened, vibrations and shifts over time can cause damage to the installation, to costly repairs and even affecting the performance of the heating system. The stability provided by adjustable radiator hold down brackets reduces the chances of such issues, ensuring that the radiator remains securely mounted throughout its lifespan.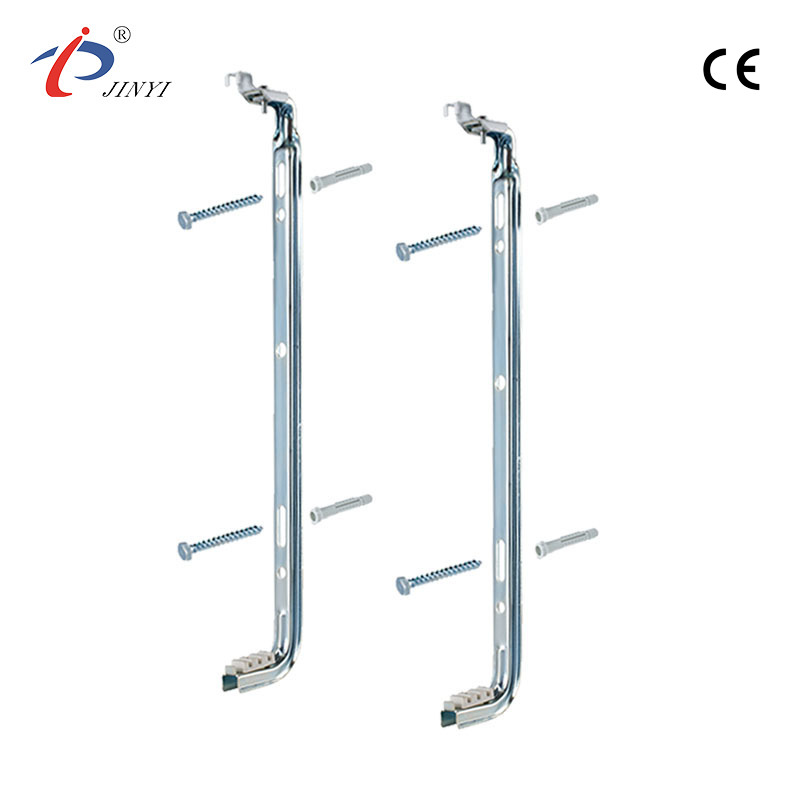
3. Compatibility and Versatility
Adjustable radiator hold down brackets are incredibly versatile, making them suitable for a wide range of radiator types and sizes. Whether you're installing a compact vertical radiator in a small bathroom or a larger horizontal model in a spacious setting, these brackets offer a universal fit. Their flexible design ensures they can be easily adjusted to accommodate different radiator models, providing the right fit for your specific needs.Moreover, some models of adjustable radiator hold down brackets come with adjustable mounting options. This allows for easy positioning and alignment with radiator fixtures, ensuring that your radiator is installed with precision. This flexibility is especially beneficial when dealing with non-standard radiator sizes or unconventional bathroom layouts.
4. Easy Integration with Bathroom Design
Beyond their functional benefits, adjustable radiator hold down brackets are designed to seamlessly integrate with the existing aesthetics of your bathroom. With their sleek, minimalist design, these brackets complement the overall look of the space, providing both form and function. Whether your bathroom features a modern, industrial vibe or a more traditional aesthetic, adjustable radiator hold down brackets can blend in effortlessly without drawing unnecessary attention.Their discreet yet reliable design ensures that they do not detract from the beauty of the radiator itself or the surrounding bathroom fixtures. This makes them an ideal choice for homeowners who are looking to maintain a clean, modern bathroom look while also ensuring the secure installation of their radiator.
-
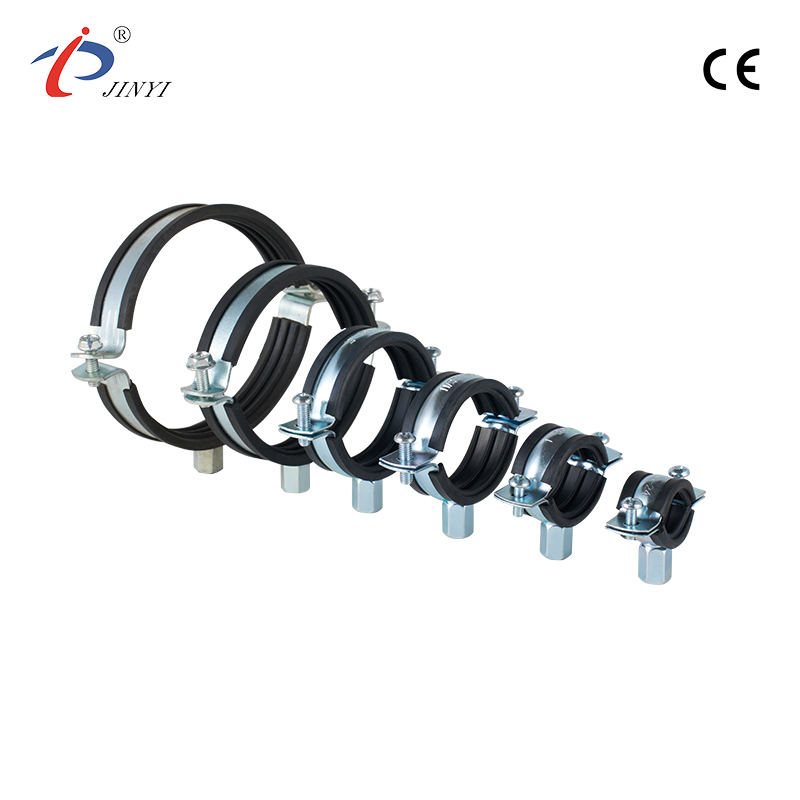
The Importance of Copper Pipe Clamps in Modern Plumbing and Construction
Feb 18, 2025
Copper pipe clamps are essential tools that play a crucial role in ensuring the integrity and efficiency of plumbing systems. These versatile fastening tools are specifically designed to securely hold copper pipes in place during installation and maintenance, making them indispensable in both residential and commercial settings. Their versatility goes beyond just plumbing—they are used across various industries, such as construction, HVAC, and electrical work, for different fastening applications. This article explores the advantages of using copper pipe clamps, their role in modern plumbing systems, and the factors contributing to their widespread use.
What Are Copper Pipe Clamps?
Copper pipe clamps are fastening devices used to hold copper pipes securely in place. These clamps are often made from durable materials such as steel, aluminum, or stainless steel and are designed with rubber or plastic linings to prevent damage to the pipes. The copper pipe clamps are used in a wide range of applications, from simple pipe installations to more complex plumbing and construction tasks. The primary function of these clamps is to ensure that copper pipes remain stable and securely fastened to structures such as walls or ceilings, which is crucial for preventing leaks, ensuring proper water flow, and maintaining the overall efficiency of plumbing systems.Advantages of Using Copper Pipe Clamps
The advantages of using copper pipe clamps are numerous, making them a valuable tool in many industries. Here are some of the key benefits:1. Durability and Strength
One of the primary advantages of copper pipe clamps is their durability and strength. Clamps are built to withstand high pressure, ensuring that pipes stay firmly in place, even during heavy-duty tasks. The materials used in copper pipe clamps, such as steel or aluminum, are chosen for their ability to provide reliable strength over an extended period. This makes copper pipe clamps a long-lasting investment that ensures the stability of your plumbing system, even in high-stress environments.The robust materials in copper pipe clamps are designed to handle the pressure exerted by water or other substances flowing through the pipes. This pressure resistance is particularly important in large-scale plumbing systems, where even a slight movement of pipes can lead to leaks or system malfunctions.
2. Ease of Use
Another key advantage of copper pipe clamps is their ease of use. clamps feature simple mechanisms, such as screw threads or spring-action designs, that allow them to be easily adjusted and applied. Whether you are a professional plumber or a DIY enthusiast, copper pipe clamps are designed for ease of operation, making them an ideal choice for both experienced contractors and novices.The adjustable design of copper pipe clamps allows for a wide range of clamping pressures, making them suitable for different material types and pipe sizes. This adaptability ensures that copper pipe clamps can be used in various plumbing and construction applications, from securing small pipes to handling larger, high-pressure systems.
3. Preventing Pipe Damage
Copper pipes are sensitive to scratches, dents, and other forms of damage, especially when subjected to heavy forces during installation. Unlike traditional metal clamps, copper pipe clamps are designed with rubber or plastic padding on the interior to prevent direct contact between the pipe and the clamp. This protective lining reduces the risk of scratches and dents, ensuring that the copper pipes remain undamaged during installation or adjustment.The smooth grip provided by copper pipe clamps ensures a secure hold without causing damage to the delicate surface of the pipes. This is particularly important for maintaining the integrity of copper plumbing systems, which are prized for their durability and resistance to corrosion.
4. Wide Range of Applications
Copper pipe clamps are not limited to plumbing systems—they can be used in a variety of industries, including construction, HVAC, and electrical work. For example, copper pipe clamps can be used to secure refrigeration tubing, electrical conduit, or any other type of piping that requires a stable and secure connection. The versatility of copper pipe clamps makes them a go-to solution for contractors and professionals working in multiple sectors.In addition to their use in piping, copper pipe clamps are also employed in a range of applications such as structural reinforcement, fastening cables, and holding materials in place during assembly or construction.
-
How to install the shower base support?
Dec 16, 2024
The installation steps of the shower base support are usually as follows:
1. Prepare tools: Make sure you have the necessary tools, such as screwdrivers, wrenches, levels, electric drills, etc.
2. Check the base: Check whether the shower base is intact and confirm that the size and shape are in line with your shower room design.
3. Positioning: According to the size of the shower base and the installation drawing, mark the location of the base on the ground.
4. Clean the floor: Make sure the installation area is clean, dust-free and oil-free, which will help the stability of the base.
5. Place the base: Place the shower base in the marked position and use a level to ensure that it is level.
6. Fix the base: Use screws or special fixings to fix the base to the ground. Make sure all fixings are tightened.
7. Check stability: Apply some pressure on the base to check whether it is stable and not shaking.
8. Install the support: Install the support on the base according to the instructions or drawings. Usually you need to insert the feet of the support frame into the holes of the base and fix them with screws.
9. Adjust the height: If the support frame has an adjustable height function, adjust it to the appropriate height as needed.
10. Check overall stability: Place some weight on the support frame to check whether the entire structure is stable.
11. Install the shower screen or door: Finally, install the shower screen or door on the support frame to ensure that they can open and close smoothly.
12. Check water tightness: After the installation is completed, perform a water test to check for leaks.
Please note that the specific installation steps may vary depending on the model of the base support frame and the manufacturer's guidance. Be sure to refer to the installation instructions included with the product for operation. If you are not sure how to operate or encounter difficulties during the installation process, it is recommended to contact a professional installer for installation. Safety first, do not perform complex installation work on your own to avoid personal injury or property damage.
-
How to choose sewer pipe clamp?
Dec 16, 2024
When choosing a sewer pipe clamp (also called a pipe clamp or pipe fixing clamp), you need to consider the following factors:
1. Applicable pipe material:
- Confirm whether the pipe clamp is suitable for your pipe material, such as PVC, cast iron, copper pipe, etc.2. Pipe size:
- Measure the outer diameter of the pipe and choose the pipe clamp of the appropriate size. The pipe clamp should match the pipe diameter to ensure tightness without damaging the pipe.3. Pipe clamp material:
- Choose the material according to the environmental conditions. For example, plastic or stainless steel may be used indoors, while corrosion-resistant materials such as stainless steel or copper may be required outdoors or in humid environments.4. Fixing method:
- Determine the fixing method of the pipe clamp. Some pipe clamps are screw-fixed, while others are snap-on. Pipe clamps fixed with screws are more stable, but installation may take more time.5. Carrying capacity:
- Choose the appropriate carrying capacity according to the weight of the pipe and the water flow pressure. Make sure the pipe clamp can withstand the weight and water pressure of the pipe.6. Installation location:
- Consider where the pipe clip will be installed, whether it needs to be installed in a corner, on the ground or on the ceiling, and choose a pipe clip suitable for that location.7. Aesthetics:
- If the pipe clip will be exposed, consider whether its appearance is coordinated with the surrounding environment.8. Durability:
- Choose a pipe clip with good durability to reduce the frequency of replacement.9. Brand and quality:
- Choose products with well-known brands and good user reviews to ensure quality and after-sales service.10. Price:
- Choose a cost-effective product according to your budget, but do not sacrifice quality to save costs.11. Compliance:
- Make sure the selected pipe clip meets local building codes and safety standards.12. Additional features:
- Some pipe clips may have additional features such as adjustable length, shockproof or soundproof, etc. Choose according to your needs.Before purchasing, it is best to be able to view or test the pipe clips in person to ensure that they meet your needs. If you are not sure, you can consult a professional or pipe supplier for advice.

![]()
- 210 Jinhai Avenue, Lupu Economic Development Zone, Yuhuan City, Taizhou City, Zhejiang Province.
- +86-576-87423248 / +86-576-87499120
- +86-17769979117 / +86-13750801289
- +86-576-87425996
- [email protected] / [email protected]

