

 русский
  Español
 -
The Rising Popularity of Stainless Steel Shower Floor Drains: A Key Feature for Modern Bathrooms

Feb 18, 2025
In recent years, the demand for high-quality bathroom fixtures has surged, and among the top trends in bathroom design are stainless steel shower floor drains. These drains are a combination of durability, functionality, and sleek design, making them an essential choice for modern bathrooms. Their popularity is driven by several key features, including their ability to combat odors and their water flow management. Below, we take a deeper look into the benefits that stainless steel shower floor drains bring to residential and commercial spaces.
1. The Role of Stainless Steel in Modern Drain Design
Stainless steel has long been praised for its resistance to rust, corrosion, and staining, making it an ideal material for bathroom and shower fixtures. Stainless steel shower floor drains offer a sleek, contemporary look while maintaining the strength needed to withstand the harsh conditions of a wet environment. The longevity of stainless steel ensures that these drains can stand up to constant water exposure without deteriorating over time, offering great value for homeowners and businesses alike.Additionally, stainless steel’s ability to blend seamlessly with various tile and flooring materials has made it a top choice in aesthetic-focused bathroom designs. Whether used in minimalist spaces or luxurious spa-like environments, stainless steel shower floor drains offer both practicality and visual appeal.
2. Anti-Odor Functionality: Ensuring a Fresh Bathroom Environment
One of the significant advantages of modern shower floor drains, particularly stainless steel models, is their anti-odor functionality. Traditional floor drains often fail to address the issue of unpleasant smells arising from the drain, which can be a common problem in areas with stagnant water. However, stainless steel shower floor drains are designed with integrated traps and advanced sealing mechanisms to effectively prevent foul odors from escaping through the drainage system.The integrated trap, often part of the drain’s design, creates a water barrier that prevents air from flowing back into the bathroom, thus blocking unpleasant odors. This feature not only ensures that your bathroom remains fresh and clean but also adds to the overall hygiene of the space. The anti-odor function is particularly essential in high-moisture areas like showers and laundry rooms, where odors can otherwise linger and make the environment less pleasant.
3. Effective Water Flow: Preventing Clogs and Promoting Hygiene
An efficient drainage system is vital for maintaining cleanliness and preventing water damage in bathrooms. Stainless steel shower floor drains are designed with drainage channels and openings to facilitate rapid water flow. By incorporating advanced engineering techniques into their design, these drains prevent clogging and ensure that water quickly and effectively flows out of the shower or bathroom area.In high-traffic spaces, such as public showers in gyms or hotels, where water flow is constant, stainless steel shower floor drains are invaluable. Their efficiency ensures that large volumes of water are drained quickly without the risk of standing water or flooding. This is crucial for preventing the growth of mold and mildew, which thrive in stagnant water and can damage flooring and walls over time.
Moreover, the smooth, non-porous surface of stainless steel minimizes the buildup of soap scum and grime, making maintenance easier and ensuring that the drain continues to function optimally. This low-maintenance aspect makes stainless steel drains an attractive option for both homeowners and businesses that require a hassle-free, efficient drainage solution.
4. Durability and Longevity: A Cost-Effective Investment
Investing in stainless steel shower floor drains is a smart long-term choice due to their durability. These drains are resistant to wear and tear caused by water, cleaning products, and foot traffic. Unlike plastic drains, which may crack or discolor over time, stainless steel maintains its structural integrity and appearance for years, offering long-lasting performance.In commercial settings, such as hotels, spas, and fitness centers, where high volumes of water are used regularly, the durability of stainless steel drains ensures that they can handle the demands of constant use. Their resistance to corrosion means they will not degrade in moist environments, making them a reliable and cost-effective choice for businesses that need to minimize maintenance and replacement costs.
-
The Growing Role of Kitchen Water Faucet Valves in Modern Plumbing Systems
Feb 18, 2025
As kitchens become the heart of the home, the focus on efficient and durable plumbing fixtures intensifies. Among the essential components in any kitchen plumbing setup, the water faucet valve plays a pivotal role. Whether it’s controlling water flow to the sink, dishwasher, or refrigerator, the kitchen water faucet valve is a critical fixture that ensures smooth, reliable operations in any modern kitchen. As technology evolves, so do the materials, design flexibility, and functionality of these valves, to more efficient and durable plumbing solutions.
1. Material Selection: Ensuring Longevity and Durability
The material chosen for kitchen water faucet valves is one of the important factors determining their durability and reliability over time. The common materials used in manufacturing these valves are stainless steel, brass, and plastic. Each material serves a different purpose and is chosen based on the fluid or gas being controlled and the intended environment.Stainless Steel: Valves made from stainless steel are highly corrosion-resistant, making them ideal for environments exposed to moisture and varying temperatures, which is typical of kitchen settings. Stainless steel valves are particularly valued in kitchens due to their ability to withstand the demands of hot water and dishwasher connections, which are frequent in everyday cooking and cleaning tasks.
Brass: Known for its strength and resistance to corrosion, brass valves are widely used in high-quality kitchen plumbing systems. Brass offers excellent durability and ensures smooth operation, particularly in systems where high-pressure water is involved. Moreover, the material has an appealing aesthetic that fits well with modern kitchen designs.
Plastic: Lightweight and cost-effective, plastic valves are another viable option for kitchen water faucets, especially for installations where weight and cost are major considerations. While plastic valves may not offer the same level of durability as metal counterparts, their resistance to corrosion makes them a popular choice in specific environments, such as small or less frequently used kitchens.
By selecting the appropriate material, homeowners ensure that the faucet valve remains in working condition even under challenging conditions. Additionally, material choice directly impacts the valve's lifespan, which is crucial for reducing the frequency of repairs and replacements in the future.
2. Design Flexibility: Customization to Meet System Needs
One of the standout features of modern kitchen faucet valves is their design flexibility. Valves come in an array of types, each suited to a specific role within the plumbing system. The ball, gate, globe, and check valves all provide different levels of control and regulation, allowing homeowners to select the valve for their specific needs.Ball Valves: Known for their durability and ability to handle high-pressure systems, ball valves are often used in kitchen applications where full water flow control is required. The on/off functionality of a ball valve is ideal for kitchen faucets and dishwashers, providing easy and efficient control over the water supply.
Gate Valves: These valves are suited for systems where the water needs to be completely shut off or fully opened. Gate valves are typically used in water main lines or for isolating a section of the plumbing system for maintenance, making them less common in everyday faucet applications but important for larger kitchen setups.
Globe Valves: Globe valves allow for more precise control of water flow, making them ideal for systems where fine-tuning the water pressure is essential. They are frequently used in kitchens where consistent water flow is needed, such as in kitchen sinks and bar faucets.
Check Valves: These valves allow water to flow in one direction and prevent backflow, ensuring that contaminated water does not re-enter the clean water system. Check valves are commonly used in kitchen plumbing systems where cross-contamination could occur, such as dishwasher installations and reverse osmosis water filtration systems.
The wide variety of valve designs gives homeowners the freedom to customize their kitchen plumbing system according to their needs, ensuring both efficiency and safety in everyday kitchen operations.
3. Corrosion-Resistance and Longevity in Kitchen Environments
The kitchen environment is inherently humid, with constant exposure to water, heat, and moisture. As such, corrosion resistance becomes a crucial factor in selecting the right faucet valve. Valves made from corrosion-resistant materials, such as stainless steel and brass, are more likely to perform reliably over time without the need for frequent maintenance. -
The Future of Modern Showers: Round Shower Heads the Way
Feb 18, 2025
In the world of bathroom fixtures, one essential element that continuously evolves in design, functionality, and durability is the shower head. Among the variety of styles, round shower heads have emerged as a top choice for modern bathrooms. Known for their sleek, minimalist design and exceptional performance, these shower heads are setting new standards in the industry. With advancements in materials, drainage technology, and water flow systems, round shower heads are now not just functional but also offer a luxurious, high-performance shower experience.
1. High-Quality Materials for Longevity and Durability
One of the standout features of round shower heads is the high-quality materials used in their construction. A significant percentage of these shower heads are made from stainless steel, a material renowned for its resistance to rust and corrosion. Stainless steel is particularly valuable in shower heads because it thrives in the highly humid and wet environment of the bathroom. This ensures long-term performance, even with constant exposure to water, soap, and cleaning agents.The scratch and stain resistance of stainless steel is another key benefit. Over time, many shower heads begin to show signs of wear, including discoloration or visible scratches that detract from their appearance. Round shower heads, however, maintain their pristine look for years, with minimal maintenance required. Their smooth, polished surface not only adds to the aesthetic appeal but also makes cleaning them easier—any soap scum or mineral buildup can be wiped away with minimal effort.
This long-lasting stainless steel construction ensures that consumers are investing in a product that provides both durability and style, making it a top choice for both residential and commercial installations.
2. Innovative Drainage and Flow Mechanisms
Round shower heads don’t just excel in material quality; they also integrate innovative drainage and flow mechanisms that contribute to an enhanced showering experience.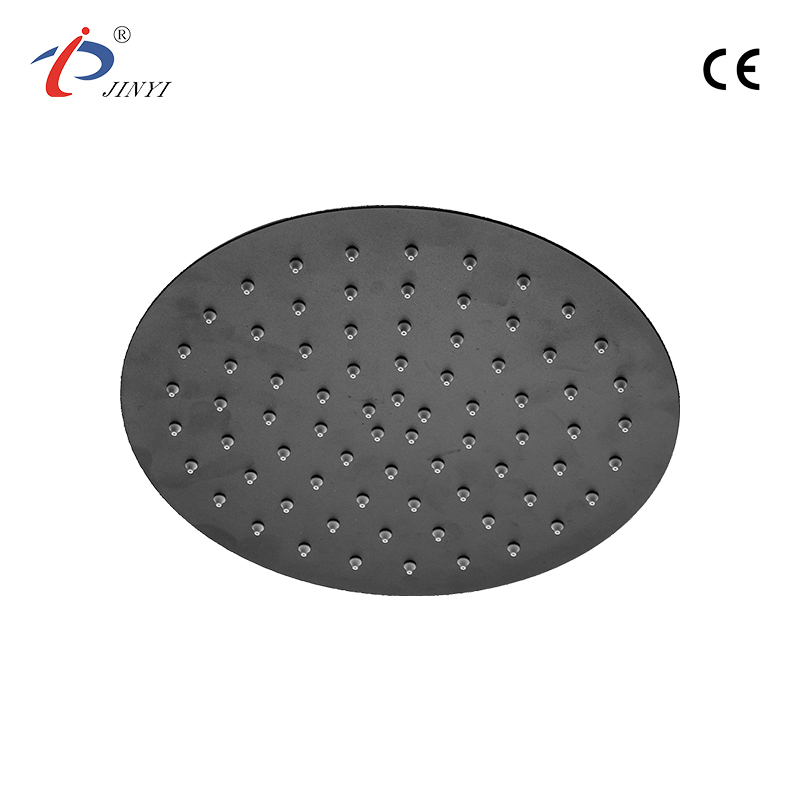
Anti-clog technology is one such feature that has revolutionized the design of modern shower heads. With the rise of long, thick hair in households, clogged drains have become a common issue. The shower channel drain in round shower heads is often equipped with anti-clog features, such as built-in filters or specially designed channels that prevent hair and debris from entering the drain. This innovative design helps to reduce maintenance needs, which is especially beneficial in busy households or commercial spaces like hotels or gyms, where cleaning frequency might not always be consistent.
The adjustable water flow is another hallmark of the round shower head's functionality. Modern shower heads now come with multiple flow settings that allow users to customize their shower experience based on personal preferences or needs. Whether you’re looking for a gentle mist to relax and unwind or strong water jets to invigorate your body and stimulate circulation, the flexibility of flow options ensures that every user can enjoy their preferred shower style.
In addition to the adjustable flow, many round shower heads incorporate water-saving technologies. These systems can help reduce water consumption while maintaining performance, making them eco-friendly options for consumers looking to conserve resources and lower utility bills without sacrificing comfort.
3. Sleek and Modern Aesthetic Design
In addition to functionality, the aesthetic appeal of round shower heads has made them a popular choice for modern bathroom designs. Their simple, clean lines and sophisticated circular shape fit seamlessly into a variety of bathroom styles, from contemporary urban apartments to luxury spa-like bathrooms.The minimalist design of these shower heads allows them to complement various bathroom fixtures and decor without overpowering the space. Whether paired with sleek, contemporary vanities or more traditional bathroom settings, round shower heads elevate the overall look of the bathroom. The chrome or brushed nickel finishes commonly found in these products reflect light beautifully, creating a polished, high-end look.
Furthermore, round shower heads often come in multiple sizes and finishes, allowing consumers to select the option to match their specific bathroom layout and style preferences. Their versatility in design and installation positions them as an ideal choice for both new constructions and bathroom renovations.
-
The Critical Role of Metal Decoupling Tanks in Industrial Fluid Systems
Feb 18, 2025
In modern industrial applications, efficient fluid management is paramount. Whether in the chemical, pharmaceutical, or oil and gas industries, controlling and separating different fluids and gases ensures that processes run smoothly and safely. One key component that has become essential in achieving this goal is the Metal Decoupling Tank. These tanks, designed with advanced technologies and built for high durability, are increasingly becoming the go-to solution for industries dealing with complex fluid systems.
1. Advanced Separation Mechanism for Fluid Control
A core feature that sets Metal Decoupling Tanks apart from other storage and separation systems is their advanced separation mechanism. Unlike traditional tanks, these decoupling tanks are engineered to handle the challenge of clearly distinguishing between multiple fluids or gases within a single system. The result is not just better control but also a cleaner and more efficient operational process.For example, in the chemical manufacturing industry, where multiple chemicals might need to be separated for proper processing, a Metal Decoupling Tank allows for more precise handling of each liquid phase. This is particularly important when dealing with hazardous or volatile substances, as proper separation ensures safety and maximizes the effectiveness of the chemicals involved.
In gas separation applications, such as those found in the petrochemical industry, the ability of the Metal Decoupling Tank to separate gases with varying densities or chemical properties provides more refined control. The separation ensures that each phase of the process—whether it's distillation, filtration, or extraction—is optimized for efficiency and safety.
Not only does this advanced separation lead to cleaner operations, but it also facilitates easier system monitoring. Operators can more effectively adjust the conditions in different sections of the process, reducing risks of contamination or incorrect processing that could lead to delays or costly production errors.
2. High Durability for Demanding Environments
Industrial environments, by their very nature, place significant stress on equipment and components. This is especially true for fluid systems, which often operate under high pressure, temperatures, and corrosive conditions. The Metal Decoupling Tank is built to withstand these tough conditions, ensuring long-term reliability and reduced downtime.Crafted from corrosion-resistant materials such as stainless steel or high-grade alloys, these tanks are able to stand up to abrasive chemicals, high-pressure environments, and the temperature fluctuations that often occur in industries like pharmaceutical manufacturing or petrochemical refining. This makes them ideal for applications where durability and resilience are crucial.
The tank's structural integrity is a key design consideration, allowing it to handle the weight of large volumes of liquid or gas without compromising on performance. Many industries rely on these tanks to support heavy-duty operations, knowing that their robust construction ensures they will continue to function effectively even under significant operational stresses.
3. Enhanced Operational Efficiency
With their advanced separation technology and high durability, Metal Decoupling Tanks contribute significantly to operational efficiency. By allowing for more effective separation and storage of liquids or gases, these tanks reduce the need for frequent maintenance, repairs, and system disruptions.For example, in the oil and gas sector, decoupling tanks are critical in separating different phases of crude oil during extraction. Their ability to efficiently manage the varying densities and chemical compositions of the liquids can speed up the extraction process, reducing time spent on manual sorting or filtration. Similarly, in pharmaceutical production, decoupling tanks improve the precision and reliability of active ingredient isolation, ensuring that formulations meet quality standards and regulatory requirements.
By offering precise fluid control, these tanks can prevent contamination between different phases, reducing the chance of errors or inconsistencies in final products. As industries push for higher productivity and leaner operations, these tanks become a crucial tool in meeting the demands of both efficiency and product quality.
4. Cost-Effectiveness and Longevity
In any industrial setting, cost management is a priority. Investing in equipment that provides long-term performance with minimal upkeep can lead to significant savings. The durable construction and low maintenance needs of Metal Decoupling Tanks make them highly cost-effective. -
The Future of Shower Base Installation: How Adjustable Support Frames Are Changing Bathroom Design
Feb 18, 2025
When it comes to designing or renovating a bathroom, one of the crucial components is the shower base. It not only determines the look and feel of the shower area but also affects its functionality and durability. With the increasing demand for customized bathroom designs, Shower Base Tray Leg Support Frames have emerged as essential tools that provide both support and flexibility. These innovative support frames offer new possibilities for homeowners, contractors, and designers looking to create the ideal shower setup.
1. Design Flexibility for Customization
The ability to customize shower setups is a hallmark of modern bathroom design. Shower Base Tray Leg Support Frames are designed to offer a customizable fit for a wide range of shower bases, ensuring that whether your base is standard or uniquely shaped, the frame can be adjusted to suit. This flexibility is particularly advantageous for homeowners and designers who are working with non-traditional shower bases or those who want to create a more personalized aesthetic.Whether you are working with a standard rectangular base, a curved design, or a larger spa-like installation, the adjustable nature of these support frames ensures that the frame can be modified to meet the specific dimensions of the shower base. This level of customization allows designers to integrate unique features into the bathroom layout while still ensuring that the base is supported adequately.
For example, in a luxury bathroom renovation, where custom-sized shower trays or curbless designs may be preferred, an adjustable support frame guarantees stability and prevents issues such as sagging or misalignment over time. This adaptability makes the frame an indispensable part of any high-end bathroom design.
2. Compatibility with Different Base Materials
Another key advantage of Shower Base Tray Leg Support Frames is their compatibility with various materials commonly used for shower bases. Whether the base is made of ceramic, acrylic, or stone, these support frames can provide solid support to ensure the base remains level and securely positioned throughout its lifespan.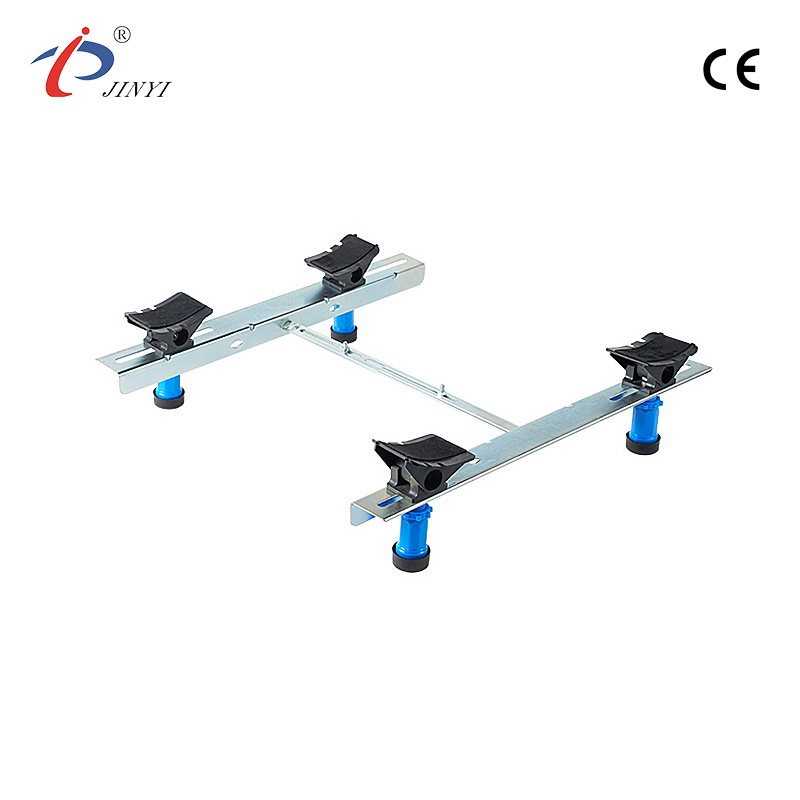
Ceramic bases, which are known for their durability and classic look, are particularly well-suited for bathrooms with traditional aesthetics. Acrylic bases, on the other hand, offer flexibility and a modern appearance, while stone bases provide a luxurious touch that pairs well with upscale bathrooms. Regardless of the material, Shower Base Tray Leg Support Frames ensure that the base remains properly supported, even under heavy use or weight, preventing cracking, bowing, or other structural issues.
For example, a stone shower base, often heavier and more prone to stress, benefits greatly from the support frame's solid structure. The frame prevents any shifting or damage to the base, making it an ideal solution for ensuring long-lasting installation.
3. Aesthetic Appeal with Hidden Installation
One of the overlooked aspects of shower installations is the visual appeal of the components. In today’s bathroom designs, where aesthetics and functionality go hand-in-hand, it is essential that the Shower Base Tray Leg Support Frame contributes to the overall look of the space. Thankfully, modern support frames are designed to remain largely hidden from view once installed, meaning the focus stays on the shower base and the bathroom’s design elements.This is particularly important for those who want to create a sleek, minimalist look in their bathrooms. With hidden installations, the unsightly components such as brackets, legs, or supports remain out of sight, ensuring that the clean, modern lines of the shower base are uninterrupted. This unobtrusive installation helps to create a more polished aesthetic, where the focus is entirely on the visual design of the space.
In many high-end bathrooms, the hidden installation capability of the support frame helps maintain a seamless design, with the frame working silently in the background to support the shower base without disrupting the visual flow. Whether in contemporary minimalist designs or luxurious spa-inspired bathrooms, the frame supports the structure without distracting from the overall beauty of the space.
4. Ease of Installation and Adjustment
Another key feature of Shower Base Tray Leg Support Frames is their ease of installation. Whether you are a seasoned contractor or a DIY enthusiast, these frames are designed to be simple to install. With adjustable legs or mounting points, these frames can be easily customized to fit your base perfectly. For those tackling a renovation project, this easy installation ensures a smooth process, minimizing installation time and effort. -
The Future of Water Meter Installation: The Advantages of Water Meter Support Fixing Brackets
Feb 18, 2025
Water meter installation is a crucial component of plumbing systems, whether for residential, commercial, or industrial applications. Ensuring the proper installation and secure placement of water meters is essential for accuracy, efficiency, and safety. Enter the Water Meter Support Fixing Bracket, a solution that promises to revolutionize how water meters are installed and maintained. With its innovative design, versatility, and ability to enhance safety, these brackets are becoming a game-changer in the plumbing industry.
1. Design Flexibility for Installation
A standout feature of the Water Meter Support Fixing Bracket is its design flexibility, offering versatile orientation options. Whether you're installing the water meter in a tight space or need to accommodate complex plumbing layouts, the bracket allows for multiple mounting positions. This flexibility is essential when working with different types of water meters and pipe configurations.The bracket can be installed horizontally or vertically, depending on the layout of the pipes and the available space. For instance, in a residential bathroom where space is limited, the ability to install the bracket horizontally might be necessary to keep the installation tidy and efficient. Conversely, in larger commercial or industrial spaces, vertical mounting may be the option for easier access and proper alignment with existing plumbing systems.
This flexibility also allows the bracket to accommodate a wide range of pipe sizes, ensuring it can be used in various types of installations, from small-scale residential projects to more complex industrial setups. The ability to adapt to different sizes makes the Water Meter Support Fixing Bracket a highly versatile product in the world of plumbing. Whether working with copper, PVC, or other types of piping, the bracket ensures that the water meter stays securely in place, regardless of the environment.
2. Enhanced Safety and Protection for Plumbing Systems
The Water Meter Support Fixing Bracket is not just about convenience and flexibility; it also plays a critical role in enhancing safety and protection in water meter installations. In plumbing systems, especially those in high-traffic areas like bathrooms, kitchens, or industrial spaces, securing components like water meters is vital to prevent accidents and damage.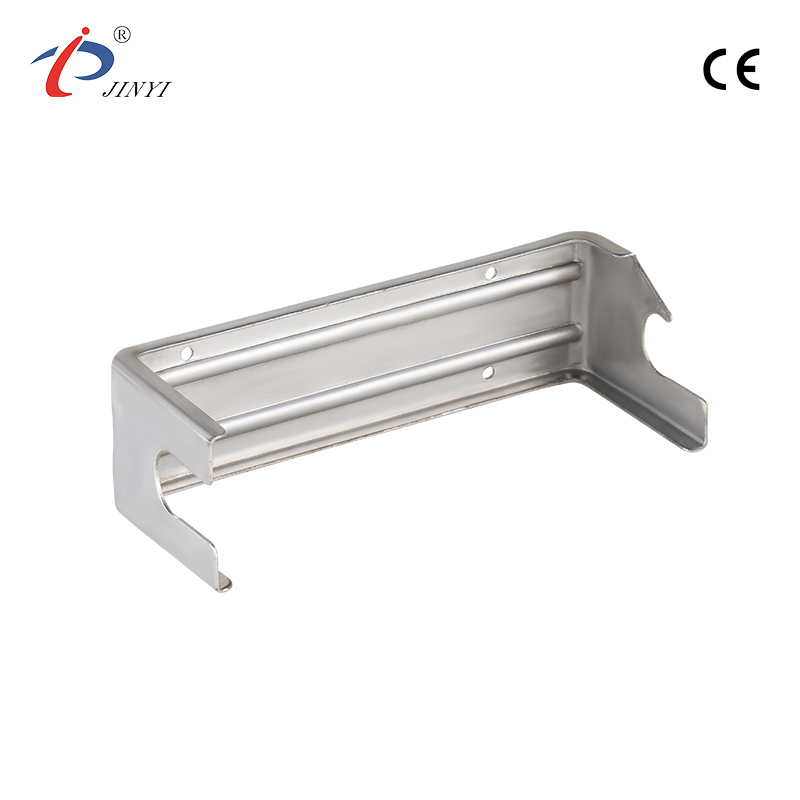
One of the key benefits of the Water Meter Support Fixing Bracket is its ability to prevent shifts and displacement. When a water meter is properly secured in place, it eliminates the risk of the meter shifting or dislodging due to external pressure or impacts. This is especially important in areas where heavy equipment or machinery might cause vibrations or movement, such as in industrial environments. With the bracket in place, water meters are less likely to be displaced, ensuring the system remains accurate and functional.
Additionally, the bracket provides an added layer of protection by securing the water meter in a fixed position. This helps prevent potential leaks or misalignments in water connections, which can lead to water damage in sensitive areas. For example, in a bathroom installation, any misalignment could result in leaks, causing water damage to walls, floors, or even ceilings. The Water Meter Support Fixing Bracket ensures that the meter remains properly aligned, reducing the risk of these costly and damaging issues.
3. The Importance of Preventing Water Damage
Water damage is one of the common and costly issues in plumbing systems. Whether it's due to a leak, burst pipe, or misalignment, water damage can wreak havoc on building structures, plumbing, and personal property. By securing the water meter in place, the Water Meter Support Fixing Bracket plays a significant role in preventing water damage.By keeping the water meter in a fixed position, the bracket helps to prevent issues such as leaks, which are often caused by improper alignment. Misalignment can occur over time due to shifts in the plumbing system, the installation of heavy appliances, or simple wear and tear. The Water Meter Support Fixing Bracket ensures that the water meter remains securely attached to the pipes, avoiding such misalignments and keeping the system functioning properly.
In addition, by offering a stable mounting solution, the bracket reduces the risk of pressure fluctuations or backflow that could damage pipes or water meters. This is especially important in high-pressure water systems, where any movement or misalignment could cause significant issues. With the bracket, homeowners and businesses can have peace of mind knowing that their water meter is securely positioned and protected from potential damage.
-
Revolutionizing Plumbing Systems: The Advantages of Metal Manifold Fixing Brackets
Feb 18, 2025
In the realm of modern plumbing and heating systems, efficient installation and durability are paramount. As new technologies emerge, products that enhance the functionality and longevity of these systems become highly sought after. One such innovation is the Metal Manifold Fixing Bracket, a solution designed to provide stability, flexibility, and long-term performance. These brackets are transforming the way manifolds are secured in various settings, from residential homes to commercial buildings.
1. The Role of Adjustable Mounting Positions
One of the standout features of Metal Manifold Fixing Brackets is their adjustable mounting positions. Traditionally, installing a manifold could be a tricky task, often requiring precise measurements and alignment to ensure the system operated efficiently. However, the adjustable mounting options integrated into these brackets have simplified the process.By offering multiple mounting positions, these brackets enable installers to fine-tune the placement of the manifold with ease. This adaptability ensures that the manifold is positioned correctly, optimizing the overall performance of the system. Whether you're dealing with a large-scale commercial project or a more compact residential setup, the flexibility of the bracket makes it easier to achieve the alignment.
In practice, this means that plumbers and contractors can install manifolds more quickly and with greater accuracy. The adjustable positions allow for precise placement, which is crucial when dealing with complex plumbing layouts. Whether working with underfloor heating systems, radiators, or hot water circuits, the ability to adjust the bracket’s position helps streamline the installation process and reduces the risk of errors.
2. Durability and Long-Lasting Finish
When it comes to plumbing installations, the longevity of the components is just as important as their initial performance. The Metal Manifold Fixing Bracket is engineered to withstand the test of time, thanks to its high-quality stainless steel finish. Stainless steel is known for its resilience and resistance to corrosion, making it an ideal material for components that are exposed to moisture and varying environmental conditions.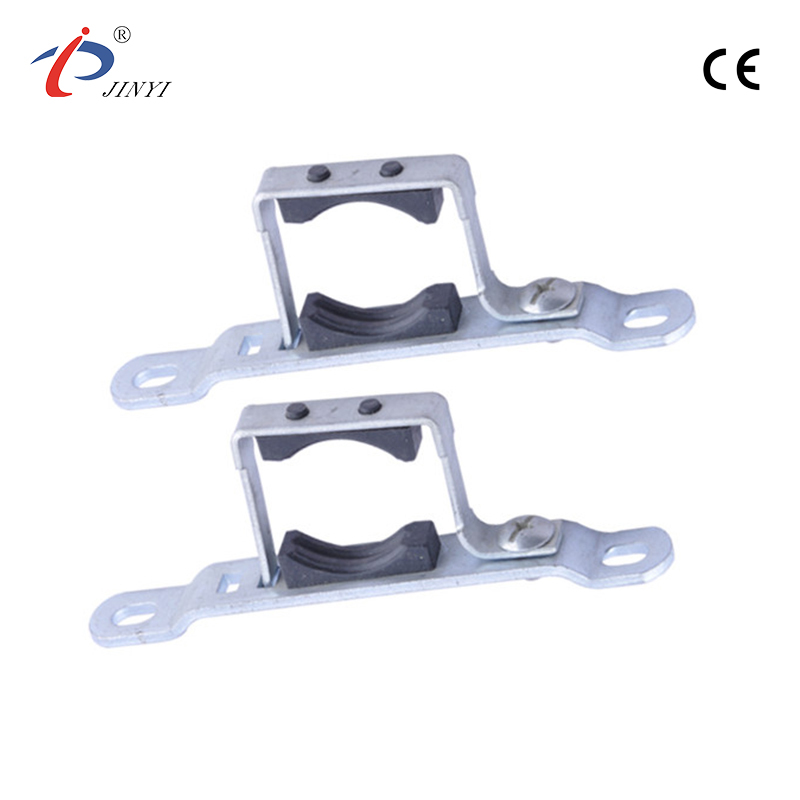
The long-lasting finish ensures that the bracket maintains its pristine appearance over time, even in humid or damp environments like bathrooms, kitchens, or utility rooms. Unlike other materials that may rust, discolor, or deteriorate, stainless steel retains its sleek and polished look. This is particularly important in applications where the aesthetics of the installation matter, as a tarnished or rusty bracket can detract from the overall appearance of the system.
Additionally, the bracket’s resistance to staining and discoloration means that it will not only perform well but will also contribute to the overall cleanliness of the installation. Whether you're installing in a residential home or a high-traffic commercial space, the Metal Manifold Fixing Bracket provides a durable and aesthetically pleasing solution that stands the test of time.
3. The Importance of Flexibility in Modern Plumbing Systems
Modern plumbing systems often require a high degree of flexibility to accommodate the diverse needs of homeowners and businesses. The Metal Manifold Fixing Bracket excels in this regard by offering both functional adaptability and ease of installation. The versatility of the bracket allows it to be used in a wide range of applications, from domestic systems like heating and water distribution to more industrial uses, such as heating in large commercial properties.By allowing the manifold to be securely mounted in various positions, these brackets facilitate efficient water flow, reduce strain on the piping, and ensure that the entire system operates at its peak. This is particularly beneficial in underfloor heating systems, where the proper placement of the manifold is essential to achieve uniform heat distribution. In these cases, the adjustable mounting positions provided by the Metal Manifold Fixing Bracket play a crucial role in achieving the desired results.
4. Time and Cost Savings for Installers
The ease of installation provided by the Metal Manifold Fixing Bracket translates to significant time and cost savings for installers. The ability to quickly adjust and secure the manifold reduces the amount of time spent on each installation. As a result, contractors can complete more projects in less time, increasing their overall productivity. -
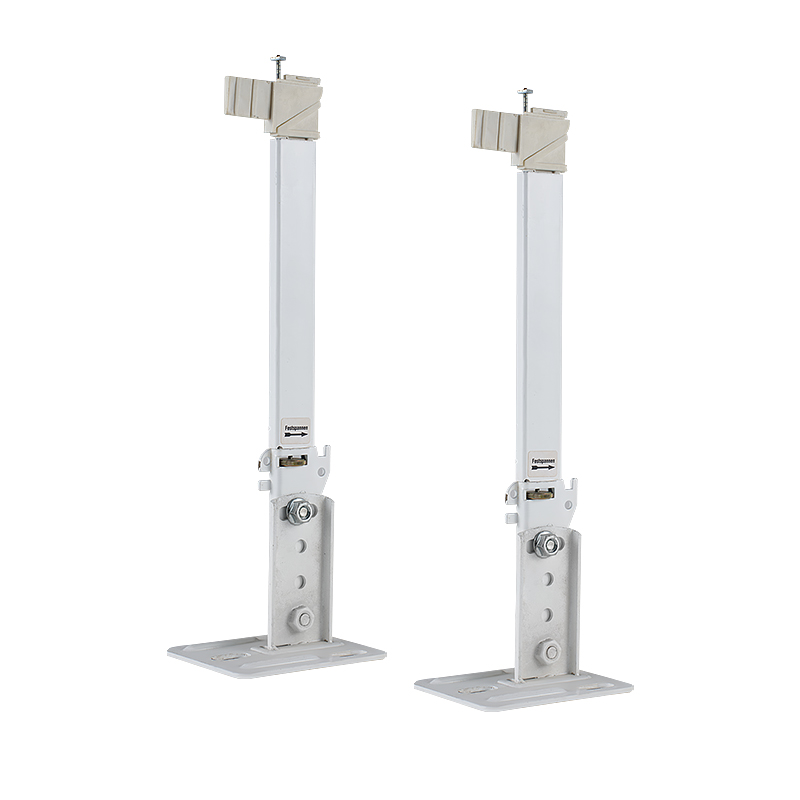
Innovations in Radiator Installation: The Rise of Universal Radiator Mounts
Feb 18, 2025
In the world of home improvement and plumbing, radiator installation is often considered a straightforward process. However, ensuring that radiators are mounted securely and safely in bathrooms and other living spaces is crucial for both functionality and safety. Universal radiator mounts have become increasingly popular in the industry due to their ease of installation, safety features, and versatility in fitting various radiator types and sizes. These mounts are making a significant impact on both professional contractors and DIY enthusiasts, offering a practical solution for efficient and secure radiator installation.
1. Ease of Installation: A Game Changer for Professionals and DIYers
One of the significant advantages of universal radiator mounts is the ease of installation they provide. Whether you're a seasoned professional or a DIY enthusiast, these mounts feature a simple mounting mechanism that drastically reduces the time and effort typically required for installation. The brackets are designed with reinforced joints and structural stability, which help eliminate unnecessary movement during installation. This design ensures that both the radiator and the wall mounts remain secure, which ultimately prevents wear and tear over time.This easy installation process is further enhanced by the clear and user-friendly instructions that come with the universal radiator mounts. These instructions are typically written in straightforward language with clear illustrations, ensuring that users—whether they're experts or novices—can install the brackets with confidence. Thanks to these helpful guides, even individuals with little prior experience can successfully mount their radiators, providing peace of mind for homeowners and contractors alike.
Additionally, the inclusion of multiple attachment points on the brackets ensures that the radiator is held firmly in place. This versatility means that users can choose the appropriate attachment points based on their specific needs, adding an extra layer of flexibility when mounting radiators in different environments.
2. Safety Enhancements: Prioritizing Security and Durability
In any installation, safety is a top priority, and universal radiator mounts have been designed with several built-in safety features to ensure that the system remains both stable and secure. One of the important safety considerations in radiator installations is the exposure to heat. Radiators, by nature, emit substantial amounts of heat, which can impact the integrity of mounting systems if not properly accounted for. To address this issue, universal radiator mounts are made from heat-resistant materials that can withstand the high temperatures typically generated by radiators. These materials ensure that the mounts retain their structural integrity even in the heat-intensive environment of a bathroom or heating system.The safety of the mount is further enhanced by its rounded edges and secure attachment system. The rounded edges help reduce the risk of accidental injuries, which can be a concern in smaller spaces like bathrooms, where sharp corners or hard surfaces are more prone to causing harm. In addition, the strong mounting system ensures that the radiator stays firmly in place, minimizing the risk of the radiator shifting or detaching over time, even in the face of regular pressure fluctuations from heating systems.
A secure, heat-resistant radiator mount also helps prevent accidents related to shifts or falls. When installed properly, the universal radiator mount creates a stable and safe environment by ensuring that the radiator stays securely attached to the wall. This is particularly important in high-traffic areas, such as bathrooms or homes with children, where accidental impacts or knocks could lead to significant damage or even personal injury.
3. Versatility Across Different Radiator Types and Settings
The universal radiator mount stands out for its ability to accommodate a variety of radiator types, making it a versatile choice for multiple installations. Whether you're working with a traditional cast-iron radiator, a modern column radiator, or a towel radiator, these mounts can be adjusted to fit the specific size and shape of your radiator. This flexibility is particularly useful in environments where space is at a premium, such as in bathrooms or small apartments.Thanks to its adaptable design, the universal radiator mount can be used in a range of installation settings, from residential bathrooms to commercial spaces. The mounting brackets are often adjustable, allowing users to modify the height or angle of the radiator for the placement and heating distribution. This feature also helps ensure that the radiator is installed at a safe distance from other fixtures, such as walls, sinks, or bathtubs, further enhancing both functionality and safety.
-
The Versatility and Efficiency of Adjustable Radiator Hose Pipe Clamps: Essential Tools for Modern Plumbing and Maintenance
Feb 18, 2025
In the world of plumbing and maintenance, the need for precise, reliable, and adaptable tools is critical. Among the many specialized tools used in this industry, adjustable radiator hose pipe clamps stand out for their versatility and essential role in ensuring secure connections and stable operations in various applications. From household heating systems to industrial machinery, these clamps offer unique advantages, providing users with greater flexibility and ease of use.
1. The Importance of Adjustability in Radiator Hose Pipe Clamps
One of the primary reasons adjustable radiator hose pipe clamps are so popular is their adjustability. Unlike fixed clamps, which are designed to fit a specific pipe or hose size, adjustable clamps come with versatile features that allow them to accommodate a wide range of pipe diameters. This adjustability is achieved through the use of adjustable arms or jaws, which can be expanded or contracted based on the size of the material being clamped.This flexibility makes adjustable clamps indispensable tools in applications that involve different pipe sizes or when working with multiple objects. Whether it’s for radiator hoses, piping systems in various HVAC applications, or even industrial settings where pipe sizes fluctuate, these clamps ensure that the right fit is always achievable.
Additionally, the adjustable radiator hose pipe clamps often feature a screw mechanism, allowing for precise tuning of the clamping pressure. This fine-tuning ability is crucial when dealing with materials that require a delicate balance of tightness—such as hoses that need to be firmly held without being damaged. By adjusting the screw, the user can apply the correct amount of pressure, ensuring a secure hold without risking damage to the components being clamped.
2. Compact and Portable: The Ideal Tool for Job Sites and Workshops
Another major benefit of adjustable radiator hose pipe clamps is their compact size and portability. Whether you’re a plumber, maintenance technician, or DIY enthusiast, having tools that are easy to carry and store is essential. These clamps are lightweight and designed for portability, making them ideal for professionals who need tools that can be easily moved from one job site to another.The small size and lightweight nature of these clamps mean they don’t take up much space in toolboxes or on storage shelves. This compactness allows for more efficient use of space, reducing clutter and ensuring that the tools are always within easy reach when needed. For workers in tight or confined spaces, such as under sinks or inside machinery, the portability of these clamps is an essential feature, making them easier to handle and use in complex installations or repairs.

Moreover, the ease of storage of adjustable radiator hose pipe clamps ensures that they can be neatly kept when not in use. This is particularly valuable for those who work in workshops or have limited storage space. The ability to store them efficiently keeps the workspace organized, allowing professionals to focus on the task at hand without worrying about misplacing or losing tools.
3. Applications Across Industries
Adjustable radiator hose pipe clamps are used in a wide variety of industries and applications, making them a versatile and valuable tool. In plumbing, these clamps are used to secure radiator hoses and piping systems, ensuring that the flow of liquids is maintained without leakage or slippage. The clamps are particularly beneficial when working on heating systems, where the proper pressure and secure connection of hoses are paramount for efficient operation.In addition to plumbing, adjustable radiator hose pipe clamps are used in automotive applications, particularly for securing hoses in engines and cooling systems. Automotive mechanics rely on these clamps to ensure that radiator hoses are tightly secured, preventing leaks and maintaining the overall integrity of the cooling system. The adjustability of the clamps is particularly beneficial in automotive work, as it allows for precise fitting and secure attachment, regardless of the size or configuration of the hoses.
These clamps also find applications in HVAC (Heating, Ventilation, and Air Conditioning) systems, where they are used to fasten ductwork and hoses that transport air or fluids. Whether in residential, commercial, or industrial HVAC setups, adjustable radiator hose pipe clamps provide a reliable solution for ensuring the stability and performance of air ducts and cooling systems.
-
The Rise of Modern Bathroom Fixture Sets: Innovation in Hardware Accessories for Functionality and Design
Feb 18, 2025
In the ever-evolving world of bathroom design, the integration of modern bathroom fixture sets is key to achieving both aesthetic appeal and functional efficiency. As bathrooms continue to evolve into spaces that offer relaxation, comfort, and practicality, hardware accessories such as building pipe clamps, radiator brackets, floor drains, stainless steel manifolds-manifold brackets, couplers, valves, bathtubs, and water meter brackets play a significant role. These components are crucial for enhancing the performance and longevity of bathroom systems, while ensuring seamless integration with contemporary designs.
1. The Role of Building Pipe Clamps in Modern Bathrooms
Building pipe clamps are essential components in modern bathroom fixture sets, as they securely hold plumbing pipes in place, ensuring stability and reducing the risk of leaks or damage. With advancements in design and materials, these clamps offer increased durability and corrosion resistance, making them ideal for bathroom environments exposed to moisture and humidity. Their versatile design allows for easy installation and adjustment, ensuring that pipes remain securely fixed throughout their lifespan.Building pipe clamps also contribute to the overall safety of the plumbing system, preventing shifting or movement of pipes that could lead to pipe damage, leaks, or even water wastage. Whether used for piping within a wall or under the floor, these clamps offer a dependable solution for modern bathroom installations, ensuring long-term efficiency and reliability.
2. Radiator Brackets: Essential for Effective Heating Systems
Radiator brackets are an often-overlooked component in modern bathrooms, yet they play a vital role in securing radiators to walls, ensuring proper heat distribution and system stability. These brackets are designed to support the weight of the radiator and provide the necessary space for airflow, allowing for heat efficiency. As bathrooms require efficient heating solutions, radiator brackets ensure that the installation process is seamless and stable, preventing damage from the weight of the radiator or incorrect placement.Additionally, radiator brackets come in various sizes and finishes, which can be customized to suit the aesthetic of the bathroom, whether it be modern, traditional, or minimalist in design. Their versatility ensures compatibility with different radiator models and sizes, providing an adaptable solution for both new and renovated bathroom projects.
.jpg)
3. Floor Drains: Ensuring Efficient Water Flow
One of the critical aspects of any bathroom system is the floor drain, an essential component for managing water drainage and preventing flooding. Modern bathroom designs often feature high-quality floor drains that offer enhanced drainage capacity and anti-clog technology, ensuring that water flows efficiently without the risk of blockages. A key feature of these modern floor drains is their sleek design, which integrates seamlessly with the bathroom’s aesthetic, whether it’s a walk-in shower or a tiled floor installation.The materials used for floor drains are typically corrosion-resistant, ensuring long-lasting durability even in humid conditions. Stainless steel floor drains, in particular, offer strength and resistance to rust, making them ideal for bathroom use. Furthermore, the anti-clog features of these drains, such as built-in filters or traps, ensure minimal maintenance and drainage efficiency, keeping bathrooms hygienic and functional.
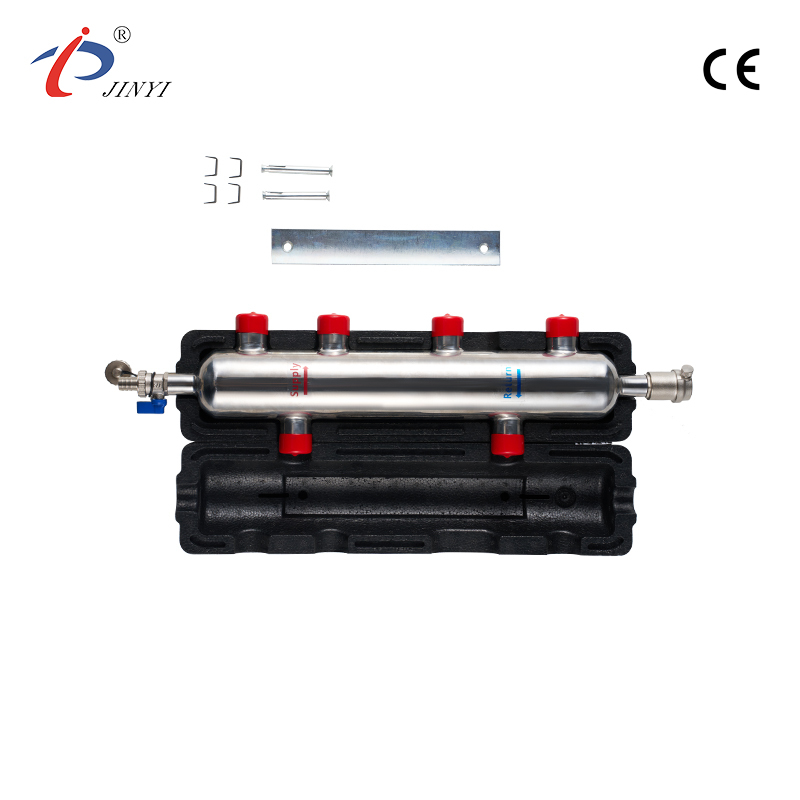
4. Stainless Steel Manifolds and Manifold Brackets
When it comes to water distribution systems, stainless steel manifolds and manifold brackets are integral components that ensure efficient fluid flow and pressure regulation. These manifolds are used to distribute water to various parts of the bathroom, such as sinks, showers, and bathtubs, while the manifold brackets securely hold the manifold system in place.Manufactured from corrosion-resistant stainless steel, these manifolds and brackets are designed for long-lasting durability, capable of withstanding high pressure and harsh environmental conditions. Their reliable performance ensures that water is distributed evenly and efficiently, preventing disruptions in water supply and maintaining system performance.
5. Couplers and Valves: Critical Components for Fluid Control
Couplers and valves are indispensable in modern plumbing systems, offering control over water flow and connection points within the bathroom. Couplers are used to join pipes together, creating secure connections that prevent leaks and ensure proper fluid flow. These components are particularly important for adapting to different pipe sizes and configurations, providing versatility in bathroom installations. -
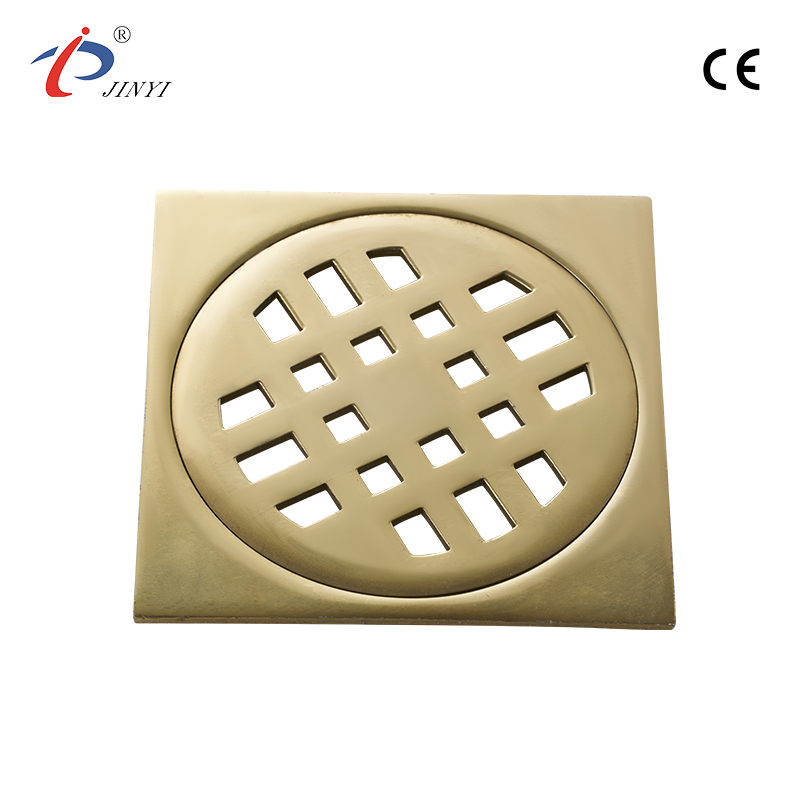
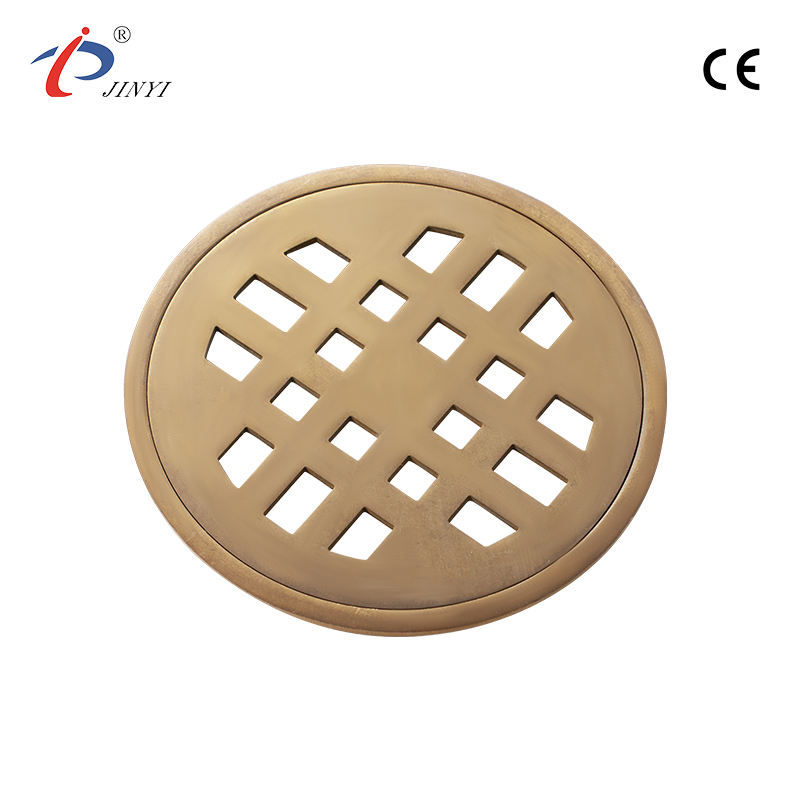
Stainless Metal Shower Floor Drains: A Blend of Functionality and Design for Modern Bathrooms
Feb 18, 2025
In the world of bathroom design and plumbing, the shower floor drain plays a pivotal role in ensuring efficient water drainage while also enhancing the aesthetics and functionality of the space. Stainless metal shower floor drains have become increasingly popular due to their versatility, durability, and sleek appearance. As a critical component of any shower system, these drains are designed to perform efficiently while blending seamlessly with the overall bathroom design. In this article, we’ll explore the key features and benefits of stainless metal shower floor drains, focusing on their versatile design and anti-odor functionality, both of which contribute to creating a better bathroom environment.
1. Versatile Design: Customizing Your Bathroom Aesthetic
One of the appealing aspects of stainless metal shower floor drains is their versatility in design. Floor drains come in a wide range of shapes, sizes, and styles, making them adaptable to various types of bathroom flooring and installation environments. Whether your bathroom features sleek, contemporary tiling or more traditional materials, these drains can be integrated into the design without compromising style or functionality.Shapes and Sizes: Stainless metal floor drains are available in square, rectangular, round, and linear designs, allowing homeowners and designers to select the ideal option that fits their space and aesthetic preferences. The linear design, in particular, has become a favorite for modern, minimalist bathrooms, as it offers a clean, streamlined look while effectively draining water from the shower area. For bathrooms with more traditional setups, round or square drains can be chosen for a more classic appearance.
Compatibility with Flooring Materials: The versatility of stainless metal shower floor drains extends to the type of flooring used in the bathroom. These drains are designed to be compatible with a wide variety of materials, including ceramic tiles, marble, stone, and even wooden or vinyl flooring. The ability to match the drain with the flooring ensures that the drainage system does not disrupt the overall visual appeal of the bathroom. The sleek stainless steel finish provides a modern, polished look that complements both contemporary and classic interior designs.
Design Integration: Beyond the shape and size, many stainless metal drains are designed to integrate with the aesthetics of the space. For example, some drains feature customizable covers, allowing the homeowner to select from different finishes, such as brushed nickel, polished chrome, or matte black. This design flexibility enables the drain to blend seamlessly with other bathroom fixtures, such as faucets, showerheads, and towel bars, ensuring a cohesive look.
2. Anti-Odor Functionality: Maintaining a Fresh and Clean Bathroom
Another standout feature of stainless metal shower floor drains is their built-in anti-odor functionality, which ensures that your bathroom remains free from unpleasant smells. This functionality is achieved through the use of an integrated trap system, which plays a crucial role in preventing foul odors from rising through the drainage system. Here’s how this important feature works:Integrated Trap System: A trap is a component within the drain that holds a small amount of water at all times. This water forms a barrier that prevents sewer gases and odors from traveling back up through the drain into the bathroom. By trapping the water in place, the anti-odor functionality ensures that the air in your bathroom remains fresh and clean, regardless of the humidity or drainage activity.
Prevention of Backflow: In addition to the trap system, many stainless metal floor drains are designed with anti-backflow mechanisms that prevent the return of dirty water or unpleasant smells. This is particularly important in high-humidity environments such as bathrooms, where moisture can often lead to the growth of bacteria or mold. The integration of such systems ensures that your bathroom remains hygienic and free from any odors that might compromise the experience.
Long-Term Freshness: One of the main benefits of having an anti-odor floor drain in your shower is the long-term freshness it provides. No more worrying about stagnant water and unpleasant smells accumulating in your bathroom. The built-in trap works efficiently to maintain a pleasant and odor-free environment, making it easier to enjoy your bathroom experience.
3. Durability and Easy Maintenance
In addition to their aesthetic and functional benefits, stainless metal shower floor drains are highly durable and require minimal maintenance. Stainless steel, known for its resistance to corrosion and rust, ensures that the floor drain remains in top condition for years to come, even in wet, humid bathroom conditions. -
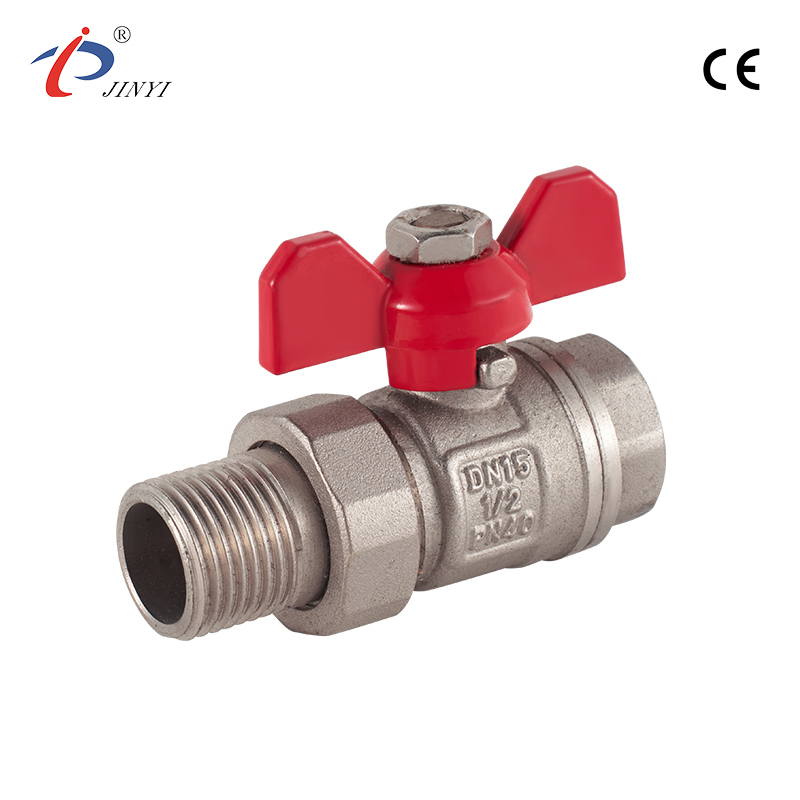
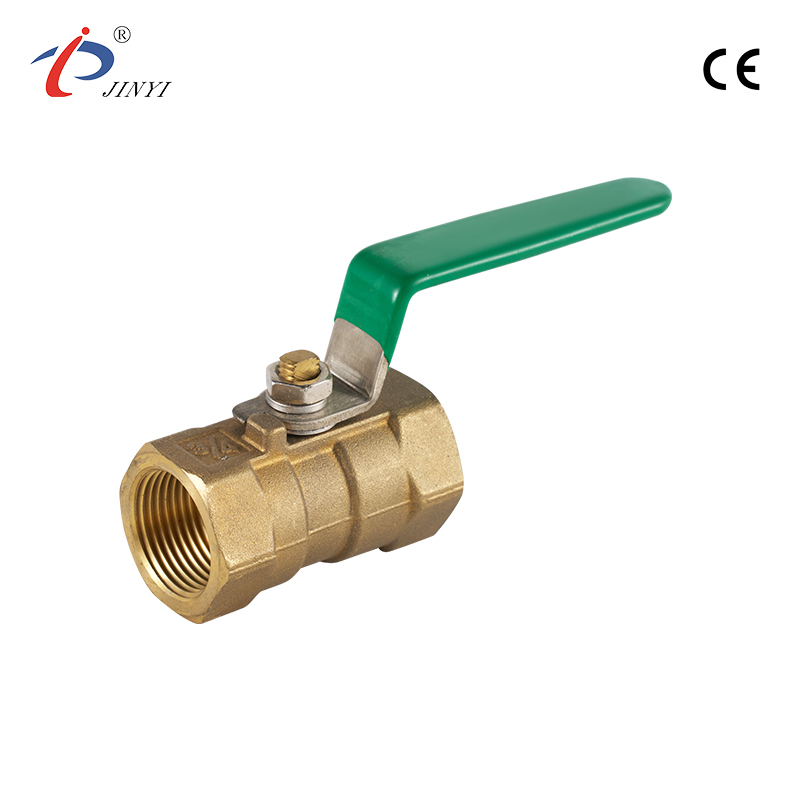
Bathroom Sink Faucet Ball Valve: The Key to Durability and Customization in Modern Plumbing Systems
Feb 18, 2025
When it comes to modern bathroom plumbing, one of the crucial components is the ball valve. Found in a variety of applications, from controlling the flow of water in faucets to regulating water heaters, the bathroom sink faucet ball valve ensures smooth operation and longevity for plumbing systems. Not only do these valves play a key role in regulating water flow, but they also provide homeowners and builders with design flexibility and the durability needed to withstand the harsh conditions of bathroom environments. This article explores the key features of bathroom sink faucet ball valves, including material selection, design flexibility, and their importance in ensuring effective water control in plumbing systems.
Material Selection: Ensuring Longevity and Performance
One of the key aspects of any bathroom sink faucet ball valve is its material selection. The material chosen for a ball valve plays a significant role in determining its functionality, durability, and suitability for different types of plumbing systems. Valves are commonly made from stainless steel, brass, or plastic, with each material offering distinct advantages depending on the specific needs of the plumbing system.Stainless Steel: Known for its strength and corrosion resistance, stainless steel is a popular choice for bathroom sink faucet ball valves. In a bathroom, where moisture and humidity are prevalent, stainless steel’s resistance to corrosion is essential to ensuring the longevity of the valve. It can withstand prolonged exposure to water and maintain its functionality even in high-humidity environments. Stainless steel ball valves are ideal for homeowners looking for long-lasting, durable solutions for their bathroom plumbing systems.
Brass: Brass is another material commonly used for bathroom sink faucet ball valves. It offers excellent strength and corrosion resistance, though it tends to be more affordable than stainless steel. Brass valves are highly durable and resistant to wear and tear, making them a great option for bathroom applications where reliability is key. Additionally, brass is highly malleable, allowing manufacturers to create custom fittings for specific plumbing needs.
Plastic: For more budget-conscious installations, plastic ball valves are often used. These valves are lightweight, affordable, and resistant to corrosion. While they may not offer the same level of durability as stainless steel or brass, plastic valves are ideal for smaller plumbing systems or less demanding applications where long-term performance is not a primary concern.
In bathroom environments, where the risk of corrosion is high due to the presence of water, valves made from corrosion-resistant materials like stainless steel or brass are the options. These materials not only enhance the valve’s lifespan but also reduce the frequency of replacements and maintenance interventions, providing cost savings for homeowners and property owners.
Design Flexibility: Customization to Fit Specific Plumbing Needs
Bathroom sink faucet ball valves are available in various designs to accommodate the specific needs of plumbing systems. From ball valves to gate valves, globe valves, and check valves, the design flexibility of these valves ensures that homeowners can select the solution for their individual needs.Ball Valves: Ball valves are known for their simplicity, reliability, and ease of use. They operate using a hollow, perforated ball that controls the flow of water through the valve. When the ball is aligned with the pipe, water flows freely; when the ball is rotated, it blocks the flow of water. This design allows for quick and easy shutoff, making it ideal for bathroom applications such as sink faucets and shower controls. The smooth operation of the ball valve is particularly beneficial for homeowners looking for a valve that requires minimal maintenance and is easy to operate.
Gate Valves: Gate valves use a sliding gate to regulate water flow. While they are more commonly used in larger systems, gate valves can still be used in bathroom plumbing systems where precise control over water flow is required. They are ideal for applications where gradual adjustment of water flow is necessary.
Globe Valves: Globe valves are often used in systems that require more precise regulation of water flow. With a design that allows for gradual adjustment, globe valves are for applications where fine-tuning of water pressure is needed. They are commonly used in shower controls or other water fixtures that require careful regulation.

![]()
- 210 Jinhai Avenue, Lupu Economic Development Zone, Yuhuan City, Taizhou City, Zhejiang Province.
- +86-576-87423248 / +86-576-87499120
- +86-17769979117 / +86-18967666977
- +86-576-87425996
- [email protected] / [email protected]

